
All in One View
Content from Introduction to Testing as a Design Tool
Last updated on 2026-07-16 | Edit this page
Estimated time: 40 minutes
Overview
Questions
- Why should you write tests first?
- What are the 3 phases of TDD?
Objectives
- Start running tests with pytest.
- Replace the end-to-end test with a pytest version.
The Ultimate Challenge (Sort Of)
Welcome! We are going to kick things off with a practical coding challenge. No slides, no long lectures—just you, some code, and a classic geometry problem.
Here is your task:
Build a Python function that determines whether two 2D rectangles overlap.
That is it. That is the entire specification.
If you are thinking, “Wait, that’s incredibly vague,” you are exactly right. It is completely ill-defined, but it is entirely comprehensible. How do we represent a rectangle? What are the inputs? What does the function return?
Before we write a single line of code, we need to clear up the ambiguity.
Pre-Task: The 3-Minute Q&A Prep (5 mins)
- Get into groups of 2 or 3.
- Take 5 minutes to look at this prompt and figure out what questions you need to ask me (the instructor) to actually build this. What details are missing?
- We will then hold a 3-minute rapid-fire Q&A where you can ask me absolutely anything you want to pin down the requirements.
(Go ahead and run the 3-minute Q&A now with your instructor!)
The Curveball
Now that we have had our Q&A and you have a rough idea of what we are building, here is the curveball:
I do not want you to write the function.
At least, not yet. Instead, I want you to write tests for the function.
Writing tests before writing code might feel backward, but there is a profound method to this madness. To do this, we need a quick primer on what a test actually looks like under the hood.
Anatomy of a Test: The “AAA” Pattern
A good test is a self-contained story. In the software world, we structure this story using the AAA (Arrange, Act, Assert) pattern:
- Arrange: Set up the initial conditions. Create the data structures, variables, or inputs your code needs.
- Act: Run the actual function or calculation you want to test.
-
Assert: Check the result. In Python, we do this
using the
assertkeyword. If the statement afterassertisTrue, nothing happens and the test passes. If it isFalse, Python raises anAssertionErrorand the test fails.
Here is a quick conceptual example of what this looks like:
Writing Rules for Our Project
To write these tests, we need to establish a few basic rules and folder structures so our test runner can find them:
-
The Workspace: Create a dedicated folder on your
computer named
testing2026. Do all your work inside this directory. -
The Test File: Create a file in that folder named
test_overlap.py. -
The Naming Convention: Pytest (our test runner) is
picky. It will only look for tests if the file name starts with
test_and the test functions themselves start withtest_.
Exercise: Write the Tests (5 mins)
Open your editor, navigate to your testing2026 folder,
and write at least three different test cases inside
test_overlap.py.
- Think of different scenarios: two rectangles that clearly overlap, two that are miles apart, etc.
- Remember, you don’t have the actual
overlap.pyfile or the overlap function yet! You will have to pretend it exists. You will need to import it at the top of your test file (e.g.,from overlap import check_overlap). - Don’t run anything yet—just write the test code!
Running the Tests (and Watching Them Fail)
To run these tests, we are going to use a Python library called
pytest. If you don’t have it installed yet, install it now
from your terminal:
Now, navigate to your testing2026 folder in your
terminal and run the test runner:
Unsurprisingly, your tests should spectacularly fail. You will likely
see a giant red error screaming
ModuleNotFoundError: No module named 'overlap'.
Of course they failed! We haven’t written a single line of the actual overlap math yet.
Testing is a Design Tool
Take a step back and think about what just happened. To write those failing tests, you were forced to make a series of critical design decisions before you wrote any implementation logic.
Ask yourself: * What did you call your function? Was
it check_overlap, is_overlapping, or just
overlap? * How did you represent a
rectangle? Did you pass in four separate coordinates
(x1, y1, x2, y2)? Did you pass in tuples? Did you represent
them as a custom class, or perhaps center coordinates with a width and
height? * What does the function return? Does it return
a boolean (True/False), or does it return the
area of the overlap?
This is the first major realization of Test-Driven Development: Testing is not just a verification phase. Testing is a design tool.
By writing the tests first, you forced yourself to become the user of your own API before you became the creator. You designed a clean, logical interface without being distracted by the complicated coordinate math.
The TDD Cycle
What we just did is the first step of Test-Driven Development (TDD). TDD is a highly disciplined software workflow built on a tight, repeating three-step loop:
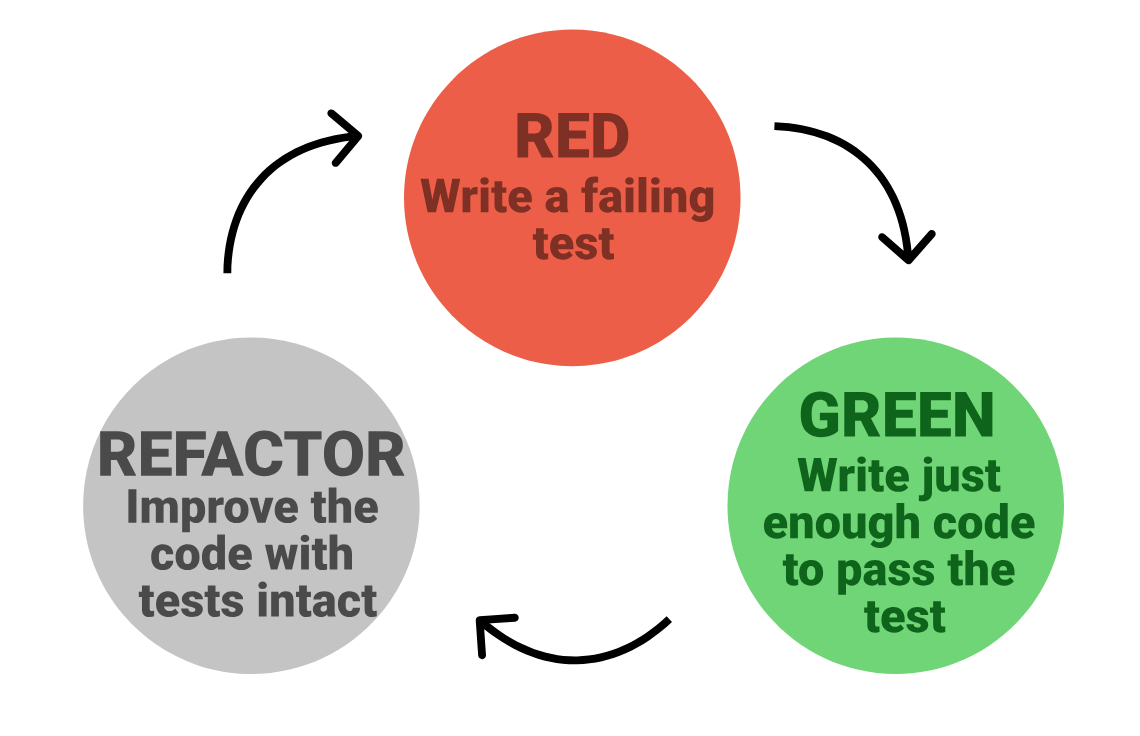
- RED: Write a test for a behavior you want, run it, and watch it fail.
- GREEN: Write the absolute simplest, dirtiest code possible to make the test pass.
- REFACTOR: Clean up your code, remove duplication, and improve the design while keeping the tests green.
Exercise: Write Code Until Things Go Green!
Now that you have your failing tests (Red) and you have locked down your design decisions, it is finally time to write the actual math.
Exercise: Get to Green (10 mins)
- Create a new file named
overlap.pyin yourtesting2026folder. - Define the overlap function using the exact name and coordinate
structure you decided on in your
test_overlap.pyfile. - Implement the logic to detect whether the rectangles overlap.
- Run
pytestin your terminal. - If it fails, tweak your math inside
overlap.pyuntil the terminal turns beautiful, satisfying green.
- TDD cycles between the phases red, green, and refactor
- TDD cycles should be fast, run tests on every write
- Writing tests first ensures you have tests and that they are working
- Making code testable forces better style
- It is much faster to work with code under test
Content from Why We Test: Verification and Validation
Last updated on 2026-07-16 | Edit this page
Estimated time: 17 minutes
Overview
Questions
- Why do we test software?
Objectives
- Understand what is testing
- Understand the goals of testing
The Natural Skepticism
If you are new to Test-Driven Development, your brain is probably screaming some version of this right now:
“Okay, that was a cool trick, but why am I restructuring my entire mental workflow for this? Can’t I just print the output and look at it?”
It is a completely fair question. When we write small, single-file scripts, manual testing (running the code, pointing our eyeballs at the screen, and saying “Yep, looks right”) feels incredibly fast.
But manual verification has a massive shelf-life problem. The moment your project grows past one file, or you hand it to a collaborator, or you return to it after a six-month hiatus, manual testing breaks down.
To understand why we build automated test suites, we need to understand the two questions every scientist must answer about their software.
Verification vs. Validation
In software engineering—and especially in computational science—we draw a hard line between two related but fundamentally different concepts: Verification and Validation.
SH
              +-----------------------------------+
              |        Computational Code         |
              +-----------------------------------+
                                |
             Is the math implemented correctly?
                                |
                [ YES: Code is VERIFIED ]
                                v
        Does the model match empirical physical reality?
                                |
                [ YES: Code is VALIDATED ]
1. Verification: “Are we building the product right?”
Verification is a check against your own specifications. It asks: Does the code do what we, the programmers, intended it to do? * Are the loops indexing correctly? * Is our rectangle overlap logic catching edge cases without throwing an error? * Are our units converted properly?
This is what software testing solves. A passing test suite means your code is verified.
2. Validation: “Are we building the right product?”
Validation is a check against the real world. It asks: Does our software model actually reflect empirical reality? * Even if our rectangle overlap code is 100% bug-free, does representing a complex biological cell as a simple 2D rectangle actually simulate cell collisions accurately? * Does our thermodynamic simulation accurately predict the physical state of the gas?
This is solved by scientific experimentation, field data, and peer review.
The Crucial Takeaway
A code can be perfectly verified while being completely invalid. Your tests can all be beautifully green, but if your underlying physical equations are wrong, your science is still wrong. However, you cannot validate an unverified model. If your code has silent indexing bugs, your physical simulations are meaningless noise. Verification is the prerequisite for validation.
Case Study: The “Supercooled Water War”
To see the real-world cost of skipped verification, we only have to look at one of the most famous computer simulation controversies in modern chemistry: the “Supercooled Water War.”
For years, researchers debated whether deeply supercooled water could spontaneously split into two distinct liquid phases of different densities. * The Claim: A highly respected Berkeley group published molecular dynamics papers claiming the answer was a definitive “No.” * The Catch: The group relied on a private, custom simulation code that wasn’t shared. * The Discovery: A Princeton team spent years trying to reproduce the Berkeley results. When they finally got a look at the Berkeley code years later, they found a critical, silent bug. An algorithmic shortcut in how the code sampled physical states meant the code wasn’t actually doing the math the scientists thought it was doing.
Because the code was never properly verified with rigorous unit tests, a silent software bug held back an entire scientific field for nearly a decade.
The Berkeley scientists had spent years validating their grand physical theories on code that was fundamentally unverified.
The High Cost of Manual Testing
If we agree we must verify our code, why can’t we just do it manually?
1. Humans are Terrible at Repetitive Tasks
If you modify your coordinate system in three weeks, are you really going to manually type in 15 different rectangle coordinates and eyeball the print statements to make sure you didn’t break anything?
No. You will test the two cases you care about right now, assume the rest are fine, and unknowingly push a silent regression bug to GitHub.
2. The Bug Cost Curve
Bugs are incredibly cheap to fix when they are caught immediately. They become exponentially more expensive—and devastating—the longer they live in your codebase.
- Caught in the TDD Loop (Seconds): Cost is zero. You fix the typo, run pytest, and move on.
- Caught before Merge (Hours/Days): Low cost. You fix it before your peers see it.
- Caught post-publication (Months/Years): Disastrous. Retracted papers, corrupt public datasets, and lost credibility.
Discussion: Your Scientific Baseline (5 mins)
Think about a computational tool, script, or model you currently use in your daily research.
- How do you currently check that this code is verified (doing what you expect)?
- What is the most terrifying silent bug that could exist in that codebase right now without you knowing?
- How would you design a simple automated test to catch that specific bug?
- Testing improves confidence about your code. It doesn’t prove that code is correct.
- Testing is a vehicle for both software design and software documentation.
- Creating and executing tests should not be an afterthought. It should be an activity that goes hand-in-hand with code development.
- Tests are themselves code. Thus, test code should follow the same overarching design principles as functional code (e.g. DRY, modular, reusable, commented, etc).
Content from Parameterized Testing
Last updated on 2026-07-16 | Edit this page
Estimated time: 25 minutes
Overview
Questions
- What is a test framework?
- How does a test framework like pytest make writing test cases easier?
Objectives
- Start writing cleaner tests with pytest.
The Problem of Test Duplication
Now that you have a passing test suite, look closely at your
test_overlap.py file. If you wrote three or four different
test cases, your file probably looks something like this:
PYTHON
from overlap import check_overlap

def test_overlapping_rectangles():
    rect_a = (0, 0, 2, 2)
    rect_b = (1, 1, 3, 3)
    assert check_overlap(rect_a, rect_b) is True

def test_separated_rectangles():
    rect_a = (0, 0, 2, 2)
    rect_b = (3, 3, 5, 5)
    assert check_overlap(rect_a, rect_b) is False

def test_subset_rectangles():
    rect_a = (0, 0, 4, 4)
    rect_b = (1, 1, 2, 2)
    assert check_overlap(rect_a, rect_b) is True
This works, but it is highly repetitive. Every single one of these
functions does the exact same thing: it sets up two coordinate tuples,
feeds them into check_overlap, and asserts a boolean
result.
If you want to test 50 different coordinate combinations, you do not want to copy-paste this boilerplate 50 times. If you change your function’s signature later, you will have to rewrite 50 different functions!
The Pytest Way: @pytest.mark.parametrize
Pytest solves this problem using a decorator called
parametrize. This allows you to write the test logic
exactly once and pass in a list of different inputs and
expected outputs.
Here is how it works:
PYTHON
import pytest
from overlap import check_overlap

@pytest.mark.parametrize(
    "rect_a, rect_b, expected",
    [
        ((0, 0, 2, 2), (1, 1, 3, 3), True),   # Overlapping
        ((0, 0, 2, 2), (3, 3, 5, 5), False),  # Separated
    ]
)
def test_overlap_scenarios(rect_a, rect_b, expected):
    assert check_overlap(rect_a, rect_b) is expected
What is Happening Here?
-
The Decorator:
@pytest.mark.parametrizetells pytest that this function is a template. -
The Argument Names: The first string
"rect_a, rect_b, expected"defines the variable names that will be passed into our test function. - The Data Matrix: The list of tuples contains our actual test cases. Each tuple in this list represents a single run of the test.
-
The Test Runner: When you run
pytest, it treats each item in the list as an entirely separate test case. If the second case fails, the first one still passes!
Exercise: Parameterize Your Overlap Tests (10 mins)
- Open
test_overlap.py. - Refactor your individual test functions into a single, clean
parameterized test function called
test_overlap_scenarios. - Add at least five different scenarios to your parametrization list (including at least one edge case, like completely identical rectangles or one rectangle entirely inside another).
- Run
pytest -v(the-vflag stands for “verbose”) in your terminal. Observe how pytest dynamically generates names for each of your parameterized runs!
Here is a clean, robust way to parameterize your overlap tests using coordinate tuples:
PYTHON
import pytest
from overlap import check_overlap

@pytest.mark.parametrize(
    "rect_a, rect_b, expected",
    [
        ((0, 0, 2, 2), (1, 1, 3, 3), True),    # Scenario 1: Partial overlap
        ((0, 0, 2, 2), (3, 3, 5, 5), False),   # Scenario 2: Distant separation
        ((0, 0, 4, 4), (1, 1, 2, 2), True),    # Scenario 3: B inside A (nested)
        ((0, 0, 2, 2), (0, 0, 2, 2), True),    # Scenario 4: Identical coordinates
        ((0, 0, 2, 2), (2, 0, 4, 2), False),   # Scenario 5: Shared boundary (touching edge)
    ]
)
def test_overlap_scenarios(rect_a, rect_b, expected):
    assert check_overlap(rect_a, rect_b) is expected
If you run this with pytest -v, your terminal output
will look like this, showing each run as its own independent check:
BASH
test_overlap.py::test_overlap_scenarios[rect_a0-rect_b0-True] PASSED
test_overlap.py::test_overlap_scenarios[rect_a1-rect_b1-False] PASSED
test_overlap.py::test_overlap_scenarios[rect_a2-rect_b2-True] PASSED
test_overlap.py::test_overlap_scenarios[rect_a3-rect_b3-True] PASSED
test_overlap.py::test_overlap_scenarios[rect_a4-rect_b4-False] PASSED- A test framework simplifies adding tests to your project.
- Choose a framework that doesn’t get in your way and makes testing fun.
- Coverage tools are useful to identify which parts of the code are executed with tests
Content from Property-Based Testing
Last updated on 2026-07-16 | Edit this page
Estimated time: 35 minutes
Overview
Questions
- What is property-based testing (PBT)?
- How to write property-based tests?
Objectives
- See how property-based testing works with Hypothesis.
The Limits of Hand-Written Examples
So far, we have tested our overlap function using hand-written coordinate examples. While this approach is great for establishing initial confidence and designing the function interface, it has a significant limitation: you can only test for the bugs you can anticipate.
If we measure our test suite’s code coverage, it might show 100%. However, 100% coverage only means that every line of code was executed at least once during our tests. It does not prove that the code is correct under all possible input combinations. For example, what happens if we input negative numbers, extremely large integers, or coordinates where the rectangle has zero width or height?
Instead of manually inventing more specific coordinate pairs to test, we can use Property-Based Testing to describe the underlying mathematical rules (properties) that our program must always obey, and let the computer generate hundreds of random scenarios to try and break those rules.
Introduction to Hypothesis
In Python, we use a library called Hypothesis to perform
property-based testing.
Rather than writing tests that assert specific outputs for specific inputs (like “Rectangle A at (0,0) and Rectangle B at (5,5) returns False”), a property-based test asserts that a general rule always holds true.
Finding Mathematical Properties in Space
When dealing with spatial overlaps, what properties are always true, regardless of what coordinates we choose?
- Commutativity (Symmetry): If Rectangle \(A\) overlaps Rectangle \(B\), then Rectangle \(B\) must overlap Rectangle \(A\). The order of arguments should not change the result: \[\text{overlap}(A, B) \equiv \text{overlap}(B, A)\]
- Idempotency (Self-Overlap): Any valid rectangle with non-zero area must overlap with itself: \[\text{overlap}(A, A) \equiv \text{True}\]
Writing a Property Test
To write these tests, we need to tell Hypothesis how to generate
valid rectangles. In our design, a rectangle is defined by four
coordinates: (xmin, ymin, xmax, ymax). To make a rectangle
physically valid, we must ensure that \(xmin
\le xmax\) and \(ymin \le
ymax\).
We can define this generation rule using a custom strategy in
Hypothesis with the @st.composite decorator.
Terminology: “Drawing” in Hypothesis
In the strategy code below, you will see a parameter called
draw.
- What it does NOT mean: It does not mean “drawing a shape,” rendering a line, or sketching a picture on your screen.
- What it DOES mean: Think of it like “drawing a card from a deck of possibilities.” You are telling the testing engine: “Draw a random integer from the deck of integers between -100 and 100, and hand it to me so I can construct my coordinates.”
Create a new test file named test_properties.py:
PYTHON
from hypothesis import given, strategies as st
from overlap import check_overlap

# Define a custom data strategy to generate valid, physical rectangles
@st.composite
def rectangles(draw):
    # Draw four coordinates from our integer deck
    x1 = draw(st.integers(min_value=-100, max_value=100))
    x2 = draw(st.integers(min_value=-100, max_value=100))
    y1 = draw(st.integers(min_value=-100, max_value=100))
    y2 = draw(st.integers(min_value=-100, max_value=100))

    # Ensure min coordinate is always less than or equal to max coordinate
    return (min(x1, x2), min(y1, y2), max(x1, x2), max(y1, y2))

# Test Property 1: Commutativity (Symmetry)
@given(rectangles(), rectangles())
def test_overlap_is_commutative(rect_a, rect_b):
    result_ab = check_overlap(rect_a, rect_b)
    result_ba = check_overlap(rect_b, rect_a)
    assert result_ab == result_ba

# Test Property 2: Self-Overlap (Idempotency)
@given(rectangles())
def test_self_overlap(rect):
    # Only check rectangles that have actual non-zero area (width and height > 0)
    if rect[2] > rect[0] and rect[3] > rect[1]:
        assert check_overlap(rect, rect) is True
Run this file using pytest:
How Hypothesis Finds Bugs (Shrinking)
If there is a flaw in your overlap math, Hypothesis will not just report a failure; it will systematically attempt to simplify the failing inputs. This process is called shrinking.
If Hypothesis breaks your code with coordinates like
(12, -87, 43, 99), it will try smaller values, eventually
printing the absolute simplest, most minimal set of numbers that causes
your test to fail (often involving simple coordinates like
0, 1, or identical overlapping edges).
Exercise: Unleash the Fuzzer
- Create the
test_properties.pyfile shown above. - Run
pytest test_properties.pyto see if youroverlap.pyimplementation satisfies these mathematical properties over 100 randomly generated scenarios. -
Intentionally introduce a bug: Open
overlap.pyand temporarily change one of your inequality comparisons (for example, change a<to a<=). - Run
pytest test_properties.pyagain. Look at the terminal output. Notice how Hypothesis identifies the failure and prints the exact “Falsifying example” coordinates. - Revert your code back to its passing state once you have observed the shrinking behavior.
- PBT emphasizes writing conditions that test examples should satisfy
- Actual test cases are auto-generated.
- “Shrinking” zeroes in on the minimal examples that trigger failure.
Content from Testing and Design
Last updated on 2026-07-16 | Edit this page
Estimated time: 20 minutes
The “Holy Trinity” of Sustainable Software
As your scientific projects grow in size and complexity, you will inevitably hit scaling friction. You might find that writing new features breaks old ones, or that collaborating on Git leads to endless, painful merge conflicts.
These problems are rarely just “version control” or “testing” issues. They are design issues. Modern, sustainable software engineering relies on a tightly integrated feedback loop often called the Holy Trinity:
- Modular Design: Breaking your code into small, decoupled, single-responsibility components.
- Unit Testing: Rapidly asserting the behavior of those isolated units.
- Version Control (Git Workflow): Developing on clean, un-entangled feature branches.
If your code is modular, writing unit tests is trivial. If your code is covered by fast, reliable unit tests, you can write code on a Git branch and merge it with 100% confidence.
If you find yourself struggling to write a clean unit test—such as needing to mock out 10 different database calls, file paths, and network APIs just to test a simple mathematical calculation—your testing framework is trying to tell you something: your design is tightly coupled.
Addressing the Big Objection: “This Takes Too Much Time!”
When first encountering Test-Driven Development and property-based testing, a very common and understandable objection is:
“This takes way too much time! I am writing almost more test code than actual implementation code. Is this really how professional computational work is done?”
There are three ways to look at this objection:
1. Conway’s Law of Prototyping
Computer scientist Melvin Conway formulated an adage (often called Conway’s Second Law or Conway’s Law of Redoing) that captures the reality of software schedules:
“There’s never enough time to do something right, but there’s always enough time to do it over.” — Melvin Conway
When we skip writing tests because we are “in a hurry,” we are not actually saving time. We are simply taking out a high-interest loan against our future schedule. * Writing code without tests feels fast initially because we defer the cost of debugging to the future. * However, finding and fixing a bug in a complex, finished system takes exponentially more hours than preventing that bug during incremental design.
2. Industry Standards: Test-to-Code Ratios
Writing more test code than production code is not a sign of poor progress; it is the industry standard for highly reliable systems:
- SQLite: The most widely deployed database engine in the world has roughly 150,000 lines of production C code, but contains over 90 million lines of test code. This is a test-to-code ratio of roughly 600 to 1.
- NASA/JPL Flight Software: Mission-critical deep space software projects routinely feature test suites, simulators, and validation systems that outsize the actual flight code by 10 to 1. When a patch cannot be easily deployed, testing is the primary mechanism of survival.
3. Your Real Job
Your job as a researcher or software engineer is not to write code. With modern large language models, code has become a cheap commodity.
Your actual job is to deliver a reliable piece of scientific software that you, your collaborators, and the broader scientific community can trust. If your simulation code produces an exciting, breakthrough result but contains a silent mathematical error, your scientific discovery is built on sand.
The Great Water Simulation War (A Cautionary Tale)
To understand the real-world scientific cost of untested code, consider the famous academic battle over supercooled water that took place between roughly 2011 and 2017.
For decades, physicists debated whether supercooled liquid water could undergo a “liquid-liquid phase transition,” splitting into two distinct phases (low-density and high-density liquid).
- The Discovery: A research group at Princeton ran massive molecular dynamics simulations and published results showing clear thermodynamic evidence that this second phase transition existed.
- The Challenger: A rival group at UC Berkeley published papers flatly contradicting Princeton’s work. They claimed the second liquid phase was a complete illusion—an artifact of slow crystallization—and released their own custom simulation code to prove it.
- The War: For seven years, these two elite groups fought bitterly at conferences and in journals. Careers of junior researchers were stalled, and massive supercomputer allocations were consumed as both sides tried to resolve why their simulations did not agree.
- The Bug: In 2017, independent researchers finally performed a rigorous audit of the Berkeley group’s custom simulation code. They discovered a subtle, hidden coding bug in the Hybrid Monte Carlo algorithm. The code successfully swapped the velocities of the water molecules, but failed to correctly account for the rigid-body rotational degrees of freedom.
Essentially, the bug left the translational motion of the molecules “hot” while the rotational motion was “cold.” This thermodynamic imbalance completely biased the simulation, erasing the second liquid phase and creating the illusion that Princeton’s discovery was wrong.
When the bug was corrected, the Berkeley code reproduced Princeton’s results perfectly. Seven years of scientific progress and computational resources were wasted because of a single, untested mathematical error in an academic script.
Terminology: Unit vs. Integration Testing
As you navigate testing literature, you will see two primary terms used to describe different types of tests:
| Test Type | Scope | Environment | Execution Speed |
|---|---|---|---|
| Unit Test | A single isolated “unit” of logic (e.g., one mathematical function or class). | In-memory only. No disk, database, or network calls. | Milliseconds (run thousands per second). |
| Integration Test | Multiple modules interacting, or interactions with external systems. | Hits local filesystems, test databases, or APIs. | Seconds to Minutes. |
The Testing Spectrum
In textbook theory, there is a sharp line between these two categories. In practice, the boundary is a spectrum of degree and context.
If your core overlap calculation calls a simple coordinate converter helper function, it is technically involving two units, but it is still fundamentally a unit test if it is fast, deterministic, and isolated in memory.
::: rationale ## The Takeaway Do not waste valuable development time arguing over pure definitions on your team.
Instead, focus on isolating non-deterministic, slow, or stateful operations (like reading files, querying databases, or making API calls) from your pure logic and algorithms (like coordinate math, simulations, and data parsing). :::
Content from Mocking and Isolation
Last updated on 2026-07-16 | Edit this page
Estimated time: 20 minutes
The Problem of External Dependencies
Unit tests are supposed to be fast, deterministic, and isolated. But real-world scientific software frequently has to interact with things outside of its direct control, such as: * Reading or writing files on a local hard drive. * Querying an external web API or database. * Running computationally expensive simulations that take hours.
If a unit test tries to interact with these external systems directly, it is no longer a unit test—it becomes a slow, brittle integration test. If the external weather database goes offline, your test suite fails, even though your local calculations are mathematically flawless.
To solve this, we use Mocks (also known as test doubles). A mock is a fake object that mimics the behavior of a real dependency, allowing you to isolate the specific unit of code you want to test.
Example: Mocking a Web API
Consider a function that fetches weather data from an external API to
calculate local atmospheric density. We want to test the density math
without actually hitting the internet every time we run
pytest.
Instead of making a real network request, we can use Pytest’s
built-in monkeypatch fixture to intercept the external call
and return a pre-configured dummy response.
PYTHON
import requests
from density_calculator import calculate_density_from_api

# 1. The code we want to test
def calculate_density_from_api(city):
    # This calls a slow, external network API
    response = requests.get(f"[https://api.weather-science.org/](https://api.weather-science.org/){city}")
    data = response.json()

    # Core mathematical logic we want to verify
    temp = data["temperature"]
    pressure = data["pressure"]
    return (pressure) / (287.05 * (temp + 273.15))


# 2. Our isolated unit test
def test_density_calculation(monkeypatch):
    # We define a dummy response class
    class MockResponse:
        def json(self):
            return {"temperature": 15.0, "pressure": 101325.0}

    # Intercept 'requests.get' and replace it with our dummy response
    monkeypatch.setattr(requests, "get", lambda url: MockResponse())

    # Act
    result = calculate_density_from_api("Geneva")

    # Assert: We can now safely verify our mathematical logic in-memory!
    assert round(result, 4) == 1.2250
Because of the mock, this test runs in under a millisecond, requires no internet connection, and will never fail due to API downtime.
When to Mock: Helpful Tool vs. Code Smell
Mocking is a powerful safety valve, but it can easily be overused. Writing highly complicated mocks to test basic logic is a major source of technical debt.
Use these heuristics to guide your design:
Scenario A: Good Mocking Targets (The Boundary)
Mocking is highly effective when applied to the
boundaries of your software system: * The
Network: Mocking API requests, database queries, or web
sockets. * The Filesystem: Mocking file creation,
read/write loops, or system hardware status. * Non-Deterministic
Inputs: Mocking things that change every time you run them,
such as system time (datetime.now()) or random number
generators.
Code Smell: “Over-Mocking”
If you have to mock out 5 layers of your own internal code just to write a unit test for a single function, your codebase is tightly coupled.
Your test is now directly bound to the internal implementation details of your code. The moment you change a variable name, split a function, or optimize your logic, all your tests will break—even if the overall calculation is still correct.
The Solution: Decouple Side Effects from Logic
Instead of writing increasingly complex mocks, the best approach is to refactor your code to separate I/O / side effects from pure calculation logic.
- Write a small, dirty function that performs the I/O (reads the database, makes the API call) and returns raw data.
- Write a pure, deterministic mathematical function that takes that raw data and does the calculations.
- Write clean, mock-free unit tests for your calculation logic. Test the I/O function sparingly using a dedicated integration test.
Discussion
Look at a recent script or program you wrote for your research.
- Where does it read files, query databases, or call external libraries?
- Are those actions mixed in directly with your calculations, or are they isolated?
- If you wanted to test your core algorithm, how much of your own script would you have to mock out?
Content from Refactoring Legacy Code
Last updated on 2026-07-16 | Edit this page
Estimated time: 35 minutes
Overview
Questions
- Why are long methods hard to test?
Objectives
- Learn some key refactoring methods to change code safely.
- Modify the overlap script to support some new features or design goals.
Confronting the Legacy Monolith
In scientific research, you will rarely start projects from a completely blank slate. More often, you will inherit an existing codebase—frequently referred to as “legacy code.”
Legacy code is often defined simply as code that doesn’t have tests. It might be a single, massive 1,000-line Python script that mixes file parsing, mathematical modeling, simulation execution, and plotting into one giant monolithic file.
Without tests, changing even a single line of this monolith feels incredibly risky. How do we clean up, modularize, and improve this code without breaking its existing functionality?
Step 1: Establish a Safety Net (Characterization Testing)
We cannot use Test-Driven Development on legacy code because the code already exists. Instead, our first step is to write a Characterization Test (also known as a Golden Master or End-to-End test).
A characterization test does not check if the code is elegantly written; it simply documents what the code actually does right now.
The Legacy Pipeline
Imagine we have inherited a legacy script named
legacy_detector.py. This script reads a text file
containing coordinates of multiple rectangles, parses them, runs nested
loops to detect overlaps, and writes a raw matrix file output
(matrix.txt) where \(i,j =
1\) if rectangle \(i\) and \(j\) overlap, and \(0\) otherwise.
To test this safely, we will write a high-level integration test that runs the script as an external process, feeds it a sample input file, and checks that the generated output matches a verified “gold standard” reference file.
PYTHON
# test_legacy.py
import subprocess
import os
import shutil

def test_legacy_integration():
    # Arrange: Set up our input and output file paths
    input_file = "test_data/sample_rectangles.txt"
    output_file = "matrix.txt"
    reference_file = "test_data/reference_matrix.txt"

    # Ensure any old output files are cleared
    if os.path.exists(output_file):
        os.remove(output_file)

    # Act: Run the legacy script as a subprocess
    result = subprocess.run(
        ["python", "legacy_detector.py", input_file],
        capture_output=True,
        text=True
    )

    # Assert: Verify the script ran successfully and generated the correct output
    assert result.returncode == 0
    assert os.path.exists(output_file)

    # Compare the output file byte-for-byte with our Golden Master reference
    with open(output_file, "r") as f_out, open(reference_file, "r") as f_ref:
assert f_out.read() == f_ref.read()Exercise: Run the Integration Test
- Create a dummy legacy script structure or use the provided legacy code in your environment.
- Run
pytest test_legacy.py. - Verify that your high-level integration test passes (turns green).
This is now your permanent safety net. If you break anything during the refactoring process, this test will catch it.
Step 2: Systematically Dismantle the Monolith
With our safety net in place, we can begin extracting modules from the legacy file.
Task A: Swap the Core Math
Find the nested coordinate loop calculations inside
legacy_detector.py. This is where the legacy code does raw,
hard-to-read inequality checks.
Since we built and fully tested a clean overlap.py
module in Episode 1 and 2, we can swap out the legacy math with our
tested module:
PYTHON
# Inside legacy_detector.py

# BEFORE:
# if not (r1[2] < r2[0] or r2[2] < r1[0] or r1[3] < r2[1] or r2[3] < r1[1]):
#     matrix[i][j] = 1

# AFTER:
from overlap import check_overlap
if check_overlap(r1, r2):
    matrix[i][j] = 1
Once you make this change, run your integration test:
If it passes, you have successfully refactored a piece of the legacy logic while maintaining absolute system stability.
Task B: Extract File Parsing
Next, locate the section of legacy_detector.py that
reads the input file and splits strings into numeric coordinate tuples.
Extract this raw I/O code into its own clean, isolated helper
function:
PYTHON
def parse_input_file(filepath):
    rectangles = []
    with open(filepath, "r") as f:
        for line in f:
            parts = line.strip().split(",")
            rectangles.append(tuple(map(float, parts)))
    return rectangles
Run pytest test_legacy.py again.
Because we decoupled file parsing from the execution loop, we can now
write small, rapid, mock-free unit tests specifically
for parse_input_file(), verifying how it handles empty
lines, whitespace, or bad input characters in memory.
The Refactoring Rule of Thumb
When modernizing legacy systems, never attempt to rewrite the entire codebase from scratch in one go. Instead, use a branch-and-extract workflow:
- Write a high-level characterization test to freeze existing behavior.
- Identify a single responsibility (like file parsing or coordinate math).
- Extract that responsibility into an isolated, pure function.
- Write fast, specific unit tests for your new function.
- Replace the legacy code blocks with calls to your new function.
- Run your high-level characterization test to verify nothing broke.
- Repeat.
- Testing long methods is difficult since you can’t pinpoint a few lines of logic.
- Testable code is also good code!
- Changing code without tests can be dangerous. Work slowly and carefully making only the simplest changes first.
- Write tests with an adversarial viewpoint.
- Keep tests DRY, fixtures and parameter can help.
Content from Brittle Tests and Bugs
Last updated on 2026-07-16 | Edit this page
Estimated time: 30 minutes
Overview
Questions
- How should you respond to bugs?
- What does it mean if you have to change a lot of tests while adding features?
- What are the advantages of testing an interface?
Objectives
- Learn how to use TDD when making large changes to code
What to Do When You Find a Bug
No matter how disciplined you are with Test-Driven Development, bugs will eventually slip into your production code. When this happens, your instinct might be to open the file and fix the code immediately.
However, professional software engineering dictates a strict, non-negotiable rule: never touch the implementation code first.
The Bug Adage
The Rule of Bug Fixing: The moment you encounter a bug, the very first thing you must do is write a test that reproduces the bug. Watch that test fail (turn Red), and then modify your code to make it pass (turn Green).
Why do we force this workflow? 1. It proves you understand the problem: If you cannot write a test that reliably fails because of the bug, you do not actually understand what is causing the bug. 2. It creates a historical record: The test is committed to Git alongside the fix, documenting exactly when and why the issue was discovered. 3. It prevents regressions: Once that test is added to your test suite, it acts as a permanent shield, ensuring that exact bug can never slip back into your codebase unnoticed.
Example: The Touching Border Bug
Imagine a researcher running our rectangle overlap code finds a bug:
when two rectangles share an edge (for example, Rectangle A’s right
border is exactly at \(x=5\), and
Rectangle B’s left border starts exactly at \(x=5\)), our code returns True
(they overlap).
In their physics simulation, sharing an edge does not constitute a physical overlap.
Following our rule, we do not edit overlap.py yet.
Instead, we write a reproducing test case first:
PYTHON
# Inside test_overlap.py

def test_touching_borders_returns_false():
    # Arrange: Rectangles share a border at x=5, but do not overlap
    rect_a = (0, 0, 5, 5)
    rect_b = (5, 0, 10, 5)

    # Act & Assert (This will fail if our math treats touching as overlapping)
    assert check_overlap(rect_a, rect_b) is False
Run pytest. Once you verify that this new test fails,
open overlap.py, adjust your inequality operators (e.g.,
changing <= to <), and run your test
suite again to verify the fix works and hasn’t broken any other
scenarios.
Testing Interfaces, Not Implementations (Brittle Tests)
A common trap for developers is writing brittle tests—tests that break when you make minor changes to your code, even though the overall behavior is still perfectly correct.
Brittle tests usually happen because you tested how the code does something (implementation details) rather than what the code is contracted to do (the interface).
The Scenario
Suppose our legacy pipeline from Episode 6 outputs a matrix file of 1s and 0s.
-
Brittle Approach: We write unit tests that assert
the exact variable names, loop counters, and temporary file paths used
inside
legacy_detector.pyto build that matrix. - Robust Approach: We only test the input file parsing and the output matrix file correctness (the public contract).
If our requirements change tomorrow, and we decide we want to output a text report containing the actual overlap percentage area instead of a binary matrix, the brittle tests will completely break and require a massive rewrite. The robust tests, however, will allow us to completely swap out the internal formulas or data structures while remaining green.
The Design Rule
Always design your tests to assert against the public interface of your modules (the inputs and expected outputs) rather than the internal, private helper mechanisms.
Testing boundaries allows you to completely refactor your math, change internal library dependencies, or optimize execution speeds without having to constantly rewrite your test suite.
Preventing Feature Creep
Why didn’t we design our overlap detector to handle 3D spheres, 1D lines, or rotated polygons right from the beginning?
Test-Driven Development acts as a powerful psychological shield against feature creep (also known as YAGNI: “You Aren’t Gonna Need It”).
When you write implementation code without tests, it is incredibly easy to get distracted by “what-ifs.” You start writing complex helper classes and configuration options for scenarios that might never happen. This introduces unnecessary complexity, increases maintenance overhead, and creates more surface area for bugs to hide.
By forcing yourself to write the test first, you force yourself to answer: “What is the exact requirement I need to solve right this second?” If there is no test asking for a feature, you do not write the code for it. This simple constraint keeps your scientific codebase lean, clean, and strictly aligned with your actual research objectives.
- Changing a lot of test code for minor features can indicate your tests are not DRY and heavily coupled.
- Do NOT invent a Swiss-army knife! TDD helps keep you focused on iterative, essential development.
- Testing a module’s interface focuses tests on what a user would typically observe. You don’t have to change as many tests when internal change.
Content from Co-Authoring with LLMs: AI and TDD
Last updated on 2026-07-16 | Edit this page
Estimated time: 20 minutes
The AI Copilot in Modern Development
Large Language Models (LLMs) have fundamentally changed how we write code. It is tempting to view traditional software methodologies like Test-Driven Development as legacy burdens from a pre-AI era.
However, co-authoring with an LLM is completely consistent with the core principles of TDD. In fact, using an LLM to help write tests is one of the most effective ways to leverage AI safely in scientific computing.
Where LLMs Excel: Writing Boilerplate and Generating Strategies
Writing tests by hand can sometimes feel repetitive. This is where an LLM can act as a powerful accelerator.
1. Generating Parametric Cases
LLMs are exceptionally good at brainstorming edge cases. You can
describe your function’s interface and ask: > “What are 10
edge-case coordinate inputs for a 2D rectangle overlap function? Output
them as a Python list of tuples compatible with
@pytest.mark.parametrize.”
2. Drafting Hypothesis Properties
Setting up property-based tests requires wrapping your head around Hypothesis strategies. You can ask an LLM to draft the boilerplate: > “Draft a Hypothesis strategy that generates two valid, non-overlapping rectangles where one is always strictly to the left of the other.”
The LLM does the heavy lifting of writing the syntax, while you focus on the high-level design of the mathematical properties.
The Danger: Outsourcing Trust
While co-authoring is highly encouraged, there is a dangerous anti-pattern: blind delegation.
  [ Danger Zone ]
  Human Drafts Code ---> LLM Writes 100 Tests ---> Blind Merge (No Trust)
The fundamental goal of testing scientific software is to build trust. You cannot outsource trust to a statistical model.
1. You are the Responsible Party
If your simulation code produces a corrupt dataset or a physically impossible thermodynamic state, you cannot blame the LLM in your peer-reviewed retraction letter. You, the human researcher, remain entirely responsible for the scientific validity of your outputs. Every line of test code generated by an AI must be vetted, understood, and run by you.
2. The Post-Hoc Testing Trap
If you write a big block of complex code, dump it into an LLM, and ask, “Write some unit tests for this,” you have completely defeated the design benefits of TDD.
- No Design Feedback: You miss the warning signs of a highly coupled design. The LLM will happily write highly complex, unreadable, brittle mocks to test your messy code, rather than prompting you to refactor it into clean, isolated units.
- Confirmational Bias: The LLM-generated tests will often simply confirm whatever bugs are already present in your implementation, validating incorrect behavior because it was asked to “test the existing code” post-hoc.
The Ideal AI-TDD Workflow
To keep your design clean and your trust intact, use this collaborative loop when working with AI:
- You design the test interface: Write the first test outline or parameterized structure yourself. This forces you to think about the modular design of your function.
- The LLM populates the matrix: Ask the LLM to generate the exhaustive list of coordinates, edge cases, or boundary conditions to fill out your test suite.
- You verify and run: Execute the test suite locally. Ensure you understand exactly why each test passes or fails.
- The LLM drafts the draft implementation: Feed the failing tests to the LLM and ask it to write the minimal code to make them turn green.
- You refactor: Clean up the code structure yourself, running the tests at every step to keep the loop tight and safe.
Content from Summary and Next Steps
Last updated on 2026-07-16 | Edit this page
Estimated time: 10 minutes
Key Takeaways
Throughout this workshop, we transitioned from writing reactive, ad-hoc scripts to designing robust, self-documenting computational workflows. Here is the core checklist to carry back to your scientific projects:
- Test First, Code Second: Writing tests before implementation forces you to define your mathematical specifications and boundary conditions clearly before you write a single line of production code.
- The Red-Green-Refactor Loop: Write a test that fails (Red), write the absolute minimum implementation to make it pass (Green), and then clean up your design (Refactor) with your test suite as a safety net.
-
Parametrize to Kill Boilerplate: Avoid duplicating
test code. Use
@pytest.mark.parametrizeto feed dozens of coordinate combinations through a single test interface. -
Let the Machine Find the Bugs: Use property-based
testing with
Hypothesisto test underlying mathematical invariants (like symmetry, idempotency, or commutativity) rather than relying solely on hand-written coordinate examples. - Mock Only the Boundaries: Use mocks to isolate your code from slow, unstable, or non-deterministic external dependencies (the network, the database, or the filesystem). Over-mocking your own internal helper functions is a code smell indicating tightly coupled design.
- Dismantle Legacy Code Safely: When refactoring a legacy monolith, freeze the existing behavior by writing a high-level “characterization test” (integration test) first. Only then should you begin extracting modules and writing fast, targeted unit tests.
- Fix Bugs by Writing Tests: Never fix a production bug in the implementation code first. Write a reproducing test case, watch it fail, and then modify your math to fix it. This creates a permanent regression guard.
- Co-Author with AI Safely: Leverage LLMs to write boilerplate, generate parametric test cases, and draft property-based strategies. However, never let an LLM write post-hoc tests for messy, untested code, as this bypasses critical design feedback and fails to build genuine trust.
Where to Go From Here: Topics for Further Study
Now that you have mastered the fundamentals of Test-Driven Development, here are the key concepts and tools to explore next as you scale your research pipelines:
1. Continuous Integration (CI) with GitHub Actions
Do not rely on running pytest manually on your laptop.
Set up a Continuous Integration workflow to automatically execute your
test suite every single time you or a collaborator pushes code to
GitHub. This ensures your main branch remains clean and mathematically
valid.
2. Mutation Testing (Using Mutmut)
How do you test your tests? Mutation testing tools automatically
inject tiny, silent bugs into your production code (like swapping a
> to a < or changing a + to
a -) and run your test suite. If your tests still pass
despite the mutation, your test suite is missing critical
assertions.
3. Pytest Fixtures for Integration Testing
Learn how to write robust integration tests using Pytest “fixtures.” Fixtures allow you to safely spin up temporary, isolated test filesystems or dummy databases, configure them before your tests run, and automatically tear them down afterward.
4. Behavior-Driven Development (BDD)
For larger, cross-disciplinary collaborations, frameworks like
Behave allow you to write executable specifications in
plain English (using the “Given-When-Then” syntax). This allows domain
scientists, stakeholders, and programmers to collaborate on a single,
shared source of truth.