Introduction
Overview
Teaching: 5 min
Exercises: 0 minQuestions
What is continuous integration / continuous deployment?
Objectives
Understand why CI/CD is important
Learn what can be possible with CI/CD
Find resources to explore in more depth
What is CI/CD?
Continuous Integration (CI) is the concept of continuously integrating all code changes. So every time a contributor (student, colleague, random bystander) provides new changes to your codebase, those changes can trigger builds, tests, or other code checks to make sure the changes don’t “break” anything. As your team of developers grow and your community of contributors grow, CI becomes your best friend to ensure quality of code!
CD can actually mean two different terms. First there is Continuous Deployment (CD) and then their is Continuous Delivery (also CD). Most people use these interchangably but there is a subtle difference.
Both CD methods are similar in that they are the literal continuous deployment of code changes. If CI is the automation of verifying code changes via testing, formatting, etc., then CD is automation of deploying / delivering those changes to your community.
The differences are that after CI passes, Continous Delivery will stage a deployment but wait for a manual action to perform the actual deployment. Continous Deployment is if CI passes, there is no manual intervention. The deployment will automatically continue.
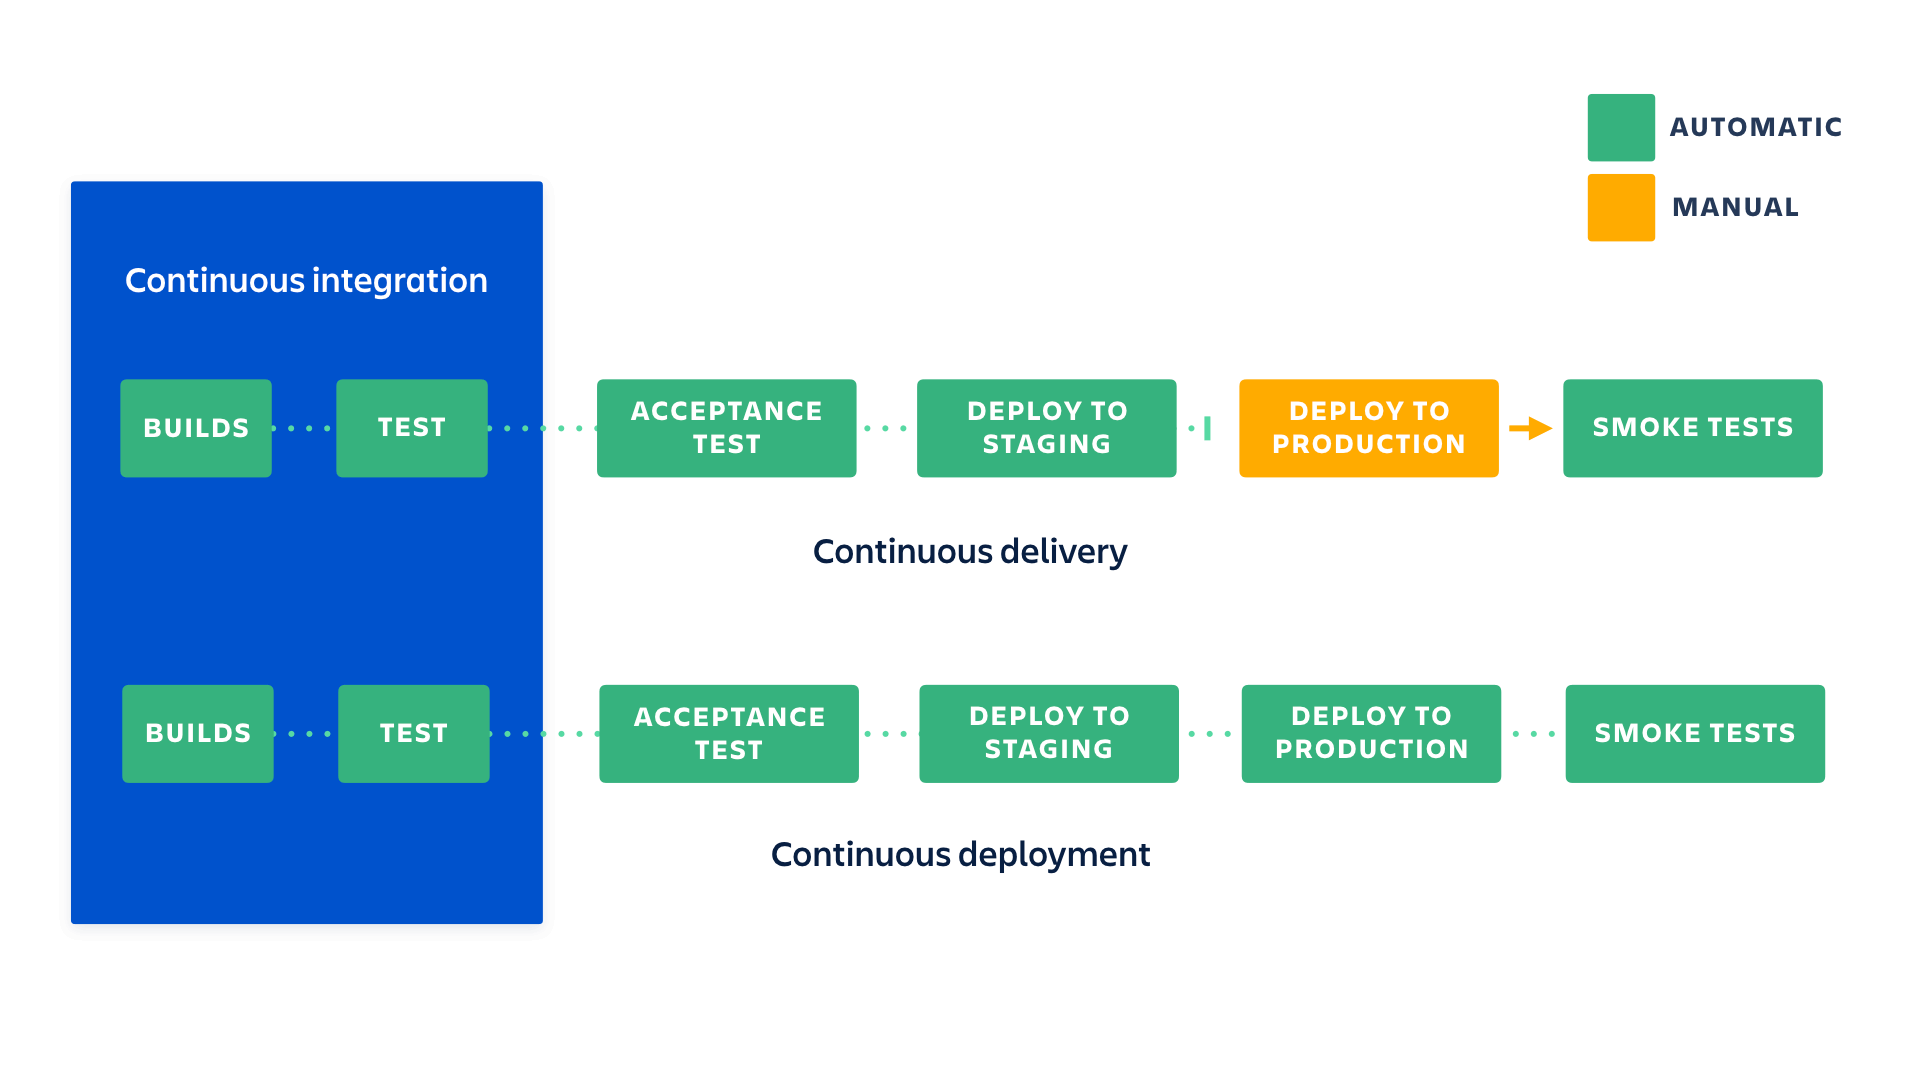 Figure 1. Differences between continous delivery vs. continous deployment and their relationship to continous integration. Image retrieved from: https://www.atlassian.com/continuous-delivery/principles/continuous-integration-vs-delivery-vs-deployment
Breaking Changes
What does it even mean to “break” something? The idea of “breaking” something is pretty contextual. If you’re working on C++ code, then you probably want to make sure things compile and run without segfaulting at the bare minimum. If it’s python code, maybe you have some tests with pytest that you want to make sure pass (“exit successfully”). Or if you’re working on a paper draft, you might check for grammar, misspellings, and that the document compiles from LaTeX. Whatever the use-case is, integration is about catching breaking changes.
Deployment
Similarly, “deployment” can mean a lot of things. Perhaps you have a Curriculum Vitae (CV) that is automatically built from LaTeX and uploaded to your website. Another case is to release docker images of your framework that others depend on. Maybe it’s just uploading documentation. Or to even upload a new tag of your python package on pypi. Whatever the use-case is, deployment is about releasing changes.
Workflow Automation
CI/CD is the first step to automating your entire workflow. Imagine everything you do in order to run an analysis, or make some changes. Can you make a computer do it automatically? If so, do it! The less human work you do, the less risk of making human mistakes.
Anything you can do, a computer can do better
Any command you run on your computer can be equivalently run in a CI job.
Don’t just limit yourself to thinking of CI/CD as primarily for testing changes, but as one part of automating an entire development cycle. You can trigger notifications to your cellphone, fetch/download new data, execute cron jobs, and so much more. However, for this lesson, you’ll be going through what you have recently learned about for python testing with pytest in the INTERSECT testing lesson and python packaging in the INTERSECT packaging lesson.
CI/CD Tools and Solutions
When it comes to picking a CI/CD solution, there are plenty to pick from. Below is a list of a few of these options:
- Native GitHub Actions
- Native GitLab CI/CD
- Circle CI
- Jenkins
- TeamCity
- Bamboo
- Travis CI
- Buddy
- CodeShip
- CodeFresh
For an even more comprehensive list, the GitHub repository ligurio/awesome-ci is a great reference!
For today’s lesson, we’ll only focus on GitHub’s solution (GitHub Actions). However, be aware that all the concepts you’ll be taught today: including pipelines, jobs, artifacts; all exist in other solutions by similar/different names. For example, GitLab supports two features known as caching and artifacts; but Travis doesn’t quite implement the same thing for caching and has no native support for artifacts. Therefore, while we don’t discourage you from trying out other solutions, there’s no “one size fits all” when designing your own CI/CD workflow.
Why are we picking GitHub Actions?!?
A few quick reasons that this was select is:
- If you already use GitHub for version control, you do not have to have a 3rd party integration for your CI/CD solution; this usually requires storing secrets between GitHub and CI/CD solution, which can be problematic if security breaches happen (example of such an event here)
- GitHub Actions is completely free for open source and free with limits for private repos!
- Servers / runners are provided for multiple operating systems.
- US-RSE uses GitHub Actions on projects like the website! So you will learn about one of the CI solutions used by the association!
Key Points
CI/CD is crucial for any reproducibility and testing
Take advantage of automation to reduce your workload
Exit Codes
Overview
Teaching: 5 min
Exercises: 10 minQuestions
What is an exit code?
Objectives
Understand exit codes
How to print exit codes
How to set exit codes in a script
How to ignore exit codes
Create a script that terminates in success/error
One very important, foundational concept of Continuous Integration / Continuous Deployment (CI/CD) tooling is exit codes. These signal to the many CI/CD tools if a job is successful or failing. The connection between exit codes and CI/CD pipelines is programming language agnostic and useful for any project understanding and debugging CI/CD issues.
Start by Exiting
How does a general task know whether or not a script finished correctly or not? You could parse (grep) the output:
> ls nonexistent-file
ls: cannot access 'nonexistent-file': No such file or directory
But every command outputs something differently. Instead, scripts also have an (invisible) exit code:
> ls nonexistent-file
> echo $?
ls: cannot access 'nonexistent-file': No such file or directory
2
The exit code is 2 indicating failure. What about on success? The exit code is 0 like so:
> echo
> echo $?
0
But this works for any command you run on the command line! For example, if I mistyped git status:
> git stauts
> echo $?
git: 'stauts' is not a git command. See 'git --help'.

The most similar command is
  status
1
and there, the exit code is non-zero – a failure.
Printing Exit Codes
As you’ve seen above, the exit code from the last executed command is stored in the $? environment variable. Accessing from a shell is easy echo $?. What about from python? There are many different ways depending on which library you use. Using similar examples above, we can use the getstatusoutput() call:
Printing Exit Codes via Python
To enter the Python interpreter, simply type
pythonin your command line.Once inside the Python interpreter, simply type
exit()then press enter, to exit.
>>> from subprocess import getstatusoutput
>>> status,output=getstatusoutput('ls')
>>> status
0
>>> status,output=getstatusoutput('ls nonexistent-file')
>>> status
2
It may happen that this returns a different exit code than from the command line (indicating there’s some internal implementation in Python). All you need to be concerned with is that the exit code was non-zero (there was an error).
Setting Exit Codes
So now that we can get those exit codes, how can we set them? Let’s explore this in shell and in python.
Shell
Create a file called bash_exit.sh with the following content:
#!/usr/bin/env bash

if [ $1 == "hello" ]
then
  exit 0
else
  exit 59
fi
and then make it executable chmod +x bash_exit.sh. Now, try running it with ./bash_exit.sh hello and ./bash_exit.sh goodbye and see what those exit codes are.
Python
Create a file called python_exit.py with the following content:
#!/usr/bin/env python

import sys


if sys.argv[1] == "hello":
  sys.exit(0)
else:
  sys.exit(59)
and then make it executable chmod +x python_exit.py. Now, try running it with ./python_exit.py hello and ./python_exit.py goodbye and see what those exit codes are. Déjà vu?
Ignoring Exit Codes
To finish up this section, you will sometimes encounter a code that does not respect exit codes. This can be very annoying when you start development with the assumption that exit status codes are meaningful (such as with CI). In these cases, you’ll need to ignore the exit code. An easy way to do this is to execute a second command that always gives exit 0 if the first command doesn’t, like so:
> ls nonexistent-file || echo ignore failure
The command_1 || command_2 operator means to execute command_2 only if command_1 has failed (non-zero exit code). Similarly, the command_1 && command_2 operator means to execute command_2 only if command_1 has succeeded. Try this out using one of scripts you made in the previous session:
> ./python_exit.py goodbye || echo ignore
What does that give you?
Overriding Exit Codes
It’s not really recommended to ‘hack’ the exit codes like this, but this example is provided so that you are aware of how to do it, if you ever run into this situation. Assume that scripts respect exit codes, until you run into one that does not.
Key Points
Exit codes are used to identify if a command or script executed with errors or not
Not everyone respects exit codes
Understanding Yet Another Markup Language
Overview
Teaching: 5 min
Exercises: 0 minQuestions
What is YAML?
Objectives
Learn about YAML
YAML
YAML (Yet Another Markup Language or sometimes popularly referred to as YAML Ain’t Markup Language (a recursive acronym)) is a human-readable data-serialization language. It is commonly used for configuration files and in applications where data is being stored or transmitted. CI systems’ heavily rely on YAML for configuration. We’ll cover, briefly, some of the native types involved and what the structure looks like.
Tabs or Spaces?
We strongly suggest you use spaces for a YAML document. Indentation is done with one or more spaces, however two spaces is the unofficial standard commonly used.
Scalars
number-value: 42
floating-point-value: 3.141592
boolean-value: true # on, yes -- also work
# strings can be both 'single-quoted` and "double-quoted"
string-value: 'Bonjour'
unquoted-string: Hello World
hexadecimal: 0x12d4
scientific: 12.3015e+05
infinity: .inf
not-a-number: .NAN
null: ~
another-null: null
key with spaces: value
datetime: 2001-12-15T02:59:43.1Z
datetime_with_spaces: 2001-12-14 21:59:43.10 -5
date: 2023-07-14
Give your colons some breathing room
Notice that in the above list, all colons have a space afterwards,
:. This is important for YAML parsing and is a common mistake.
Lists and Dictionaries
Elements of a list start with a “- “ (a dash and a space) at the same indentation level.
breeds:
  - Beagle
  - Corgi
  - German Shepherd
  - Poodle
Elements of a dictionary are in the form of “key: value” (the colon must followed by a space).
madrigal:
  name: Bruno Madrigal
  voice-actor: John Leguizamo
  gift: sees the future
  allowed-to-talk-about-character: no no no
Inline-Syntax
Since YAML is a superset of JSON, you can also write JSON-style maps and sequences.
sisters: ["Julieta", "Pepa"]
parents: {father: Pedro, mother: Alma}
Multiline Strings
In YAML, there are two different ways to handle multiline strings. This is useful, for example, when you have a long code block that you want to format in a pretty way, but don’t want to impact the functionality of the underlying CI script. In these cases, multiline strings can help. For an interactive demonstration, you can visit https://yaml-multiline.info/.
Put simply, you have two operators you can use to determine whether to keep newlines (|, exactly how you wrote it) or to remove newlines (>, fold them in). Similarly, you can also choose whether you want a single newline at the end of the multiline string, multiple newlines at the end (+), or no newlines at the end (-). The below is a summary of some variations:
folded_no_ending_newline:
  script:
    - >-
      echo "foo" &&
      echo "bar" &&
      echo "baz"


    - echo "do something else"

unfolded_ending_single_newline:
  script:
    - |
      echo "foo" && \
      echo "bar" && \
      echo "baz"


    - echo "do something else"
Nested
requests:
  # first item of `requests` list is just a string
  - http://example.com/

  # second item of `requests` list is a dictionary
  - url: http://example.com/
    method: GET
Comments
Comments begin with a pound sign (#) and continue for the rest of the line:
# This is a full line comment
foo: bar # this is a comment, too
Anchors
YAML also has a handy feature called ‘anchors’, which let you easily duplicate content across your document. Anchors look like references & in C/C++ and named anchors can be dereferenced using *.
anchored_content: &anchor_name This string will appear as the value of two keys.
other_anchor: *anchor_name

base: &base
  name: Everyone has same name

foo: &foo
  <<: *base
  age: 10

bar: &bar
  <<: *base
  age: 20
The << allows you to merge the items in a dereferenced anchor. Both bar and foo will have a name key.
What CI/CD tools use YAML
The following are just some of the CI/CD tools that use YAML:
- Native GitHub Actions YAML Docs
- Native GitLab CI/CD YAML Docs
- Circle CI YAML Docs
- Bamboo YAML Docs
- Travis CI YAML Docs
- CodeShip YAML Docs
- CodeFresh YAML Docs
Understanding YAML, like exit codes, is foundational and a general skill for almost all CI/CD tools.
Key Points
YAML is a plain-text format, similar to JSON, useful for configuration
YAML is used in many CI/CD tools and solutions
YAML and GitHub Actions
Overview
Teaching: 5 min
Exercises: 0 minQuestions
What is the GitHub Actions specification?
Objectives
Learn where to find more details about everything for the GitHub Actions.
Understand the components of GitHub Actions YAML file.
GitHub Actions YAML
The GitHub Actions configurations are specified using YAML files stored in the.github/workflows/ directory.
Let us look at a basic example:
name: example

on: push

jobs:
  job_1:
    runs-on: ubuntu-latest
    steps:
      - name: My first step
        run: echo This is the first step of my first job.
name: GitHub displays the names of your workflows on your repository’s actions page. If you omit name, GitHub sets it to the YAML file name.
on: Required. Specify the event that automatically triggers a workflow run. This example uses the push event, so that the jobs run every time someone pushes a change to the repository.
For more details, check this link.
jobsSpecify the job(s) to be run on the CI/CD servers or job runners. Jobs run in parallel by default. To run jobs sequentially, you have to define dependencies on other jobs. This will be covered later.
<job_id>: Each job must have an id to associate with the job, job_1 in the above example. The key job_id is a string that is unique to the jobs object. It must start with a letter or _ and contain only alphanumeric characters, -, or _. Its value is a map of the job’s configuration data.
runs-on: Required. Each job runs in an virtual environment specified by the key runs-on. Available environments can be found here.
steps: Specify sequence of tasks. A step is an individual task that can run commands (known as actions). Each step in a job executes on the same runner, allowing the actions in that job to share data with each other. If you do not provide aname, the step name will default to the text specified in theruncommand.
Overall Structure
Every single parameter we consider for all configurations are keys under jobs. The YAML is structured using job names. For example, we can define two jobs that run in parallel with different sets of parameters.
name: <name of your workflow>

on: <event or list of events>

jobs:
  job_1:
    name: <name of the first job>
    runs-on: <type of machine to run the job on>
    steps:
      - name: <step 1>
        run: |
          <commands>
      - name: <step 2>
        run: |
          <commands>
  job_2:
    name: <name of the second job>
    runs-on: <type of machine to run the job on>
    steps:
      - name: <step 1>
        run: |
          <commands>
      - name: <step 2>
        run: |
          <commands>
Reference
The reference guide for all GitHub Actions pipeline configurations is found at workflow-syntax-for-github-actions. This contains all the different parameters you can assign to a job.
Key Points
You should bookmark the GitHub Actions reference. You’ll visit that page often.
Actions are standalone commands that are combined into steps to create a job.
Workflows are made up of one or more jobs and can be scheduled or triggered.
Hello CI World
Overview
Teaching: 5 min
Exercises: 5 minQuestions
How do I run a simple GitHub Actions job?
Objectives
Add CI/CD to your project.
Now, we will be adding a GitHub Actions YAML file to a repository. This is all we will need to run CI using GitHub Actions.
If you haven’t already, use the Setup instructions
to get the example intersect-training-cicd repository setup locally
and remotely in GitHub.
Adding CI/CD to a project
The first thing we’ll do is create a .github/workflows/main.yml file in the project.
cd intersect-training-cicd
mkdir -p .github/workflows
Open .github/workflows/main.yml with your favorite editor and add the following
name: example
on: push
jobs:
  greeting:
    runs-on: ubuntu-latest
    steps:
      - name: Greeting!
        run: echo hello world
Run GitHub Actions
We’ve created the .github/workflows/main.yml file but it’s not yet on GitHub.
Next step we’ll push these changes to GitHub so that it can run our job.
Since we’re adding a new feature (adding CI) to our project, we’ll work in a feature branch.
git checkout -b add-ci
git add .github/workflows/main.yml
git commit -m "Adds initial GitHub Actions for CI"
git push -u origin add-ci
And that’s it!
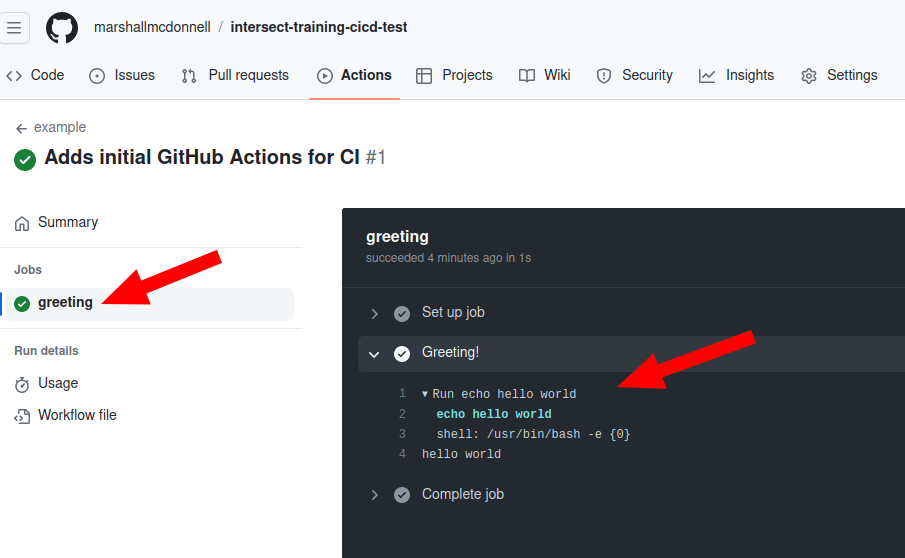
You’ve successfully run your CI job and you can view the output.
You just have to navigate to the GitHub webpage for the intersect-training-cicd project
and hit Actions button.
There, you will find details of your job (status, output,…).
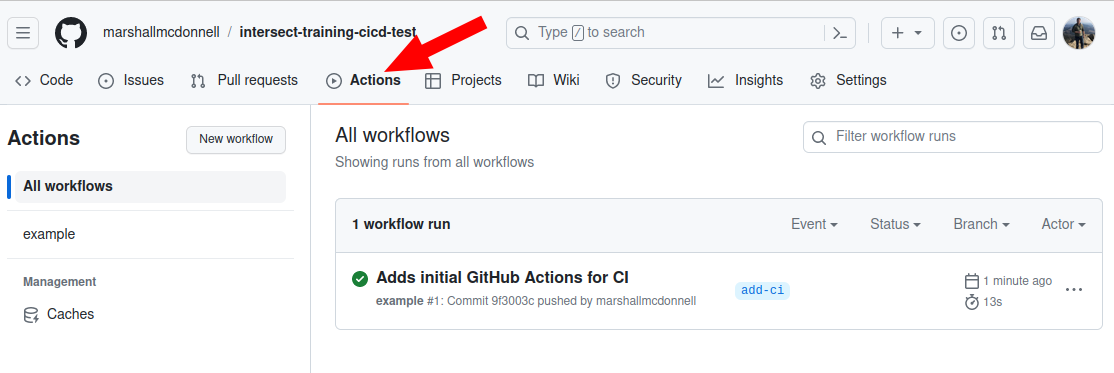
From this page, click through until you can find the output for the successful job run which should look like the following
Pull Request
Lastly, we’ll open up a pull request for this branch, since we plan to merge this back into main when we’re happy with the first iteration of the Actions.
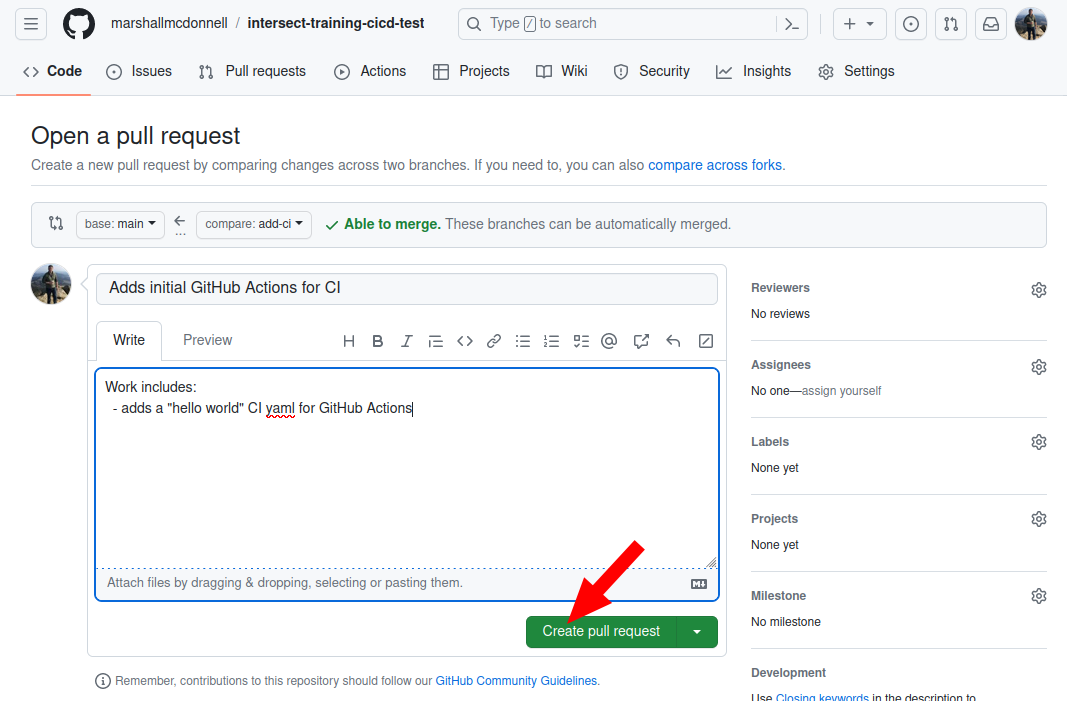
See the beauty of the passing CI checks for your pull request!
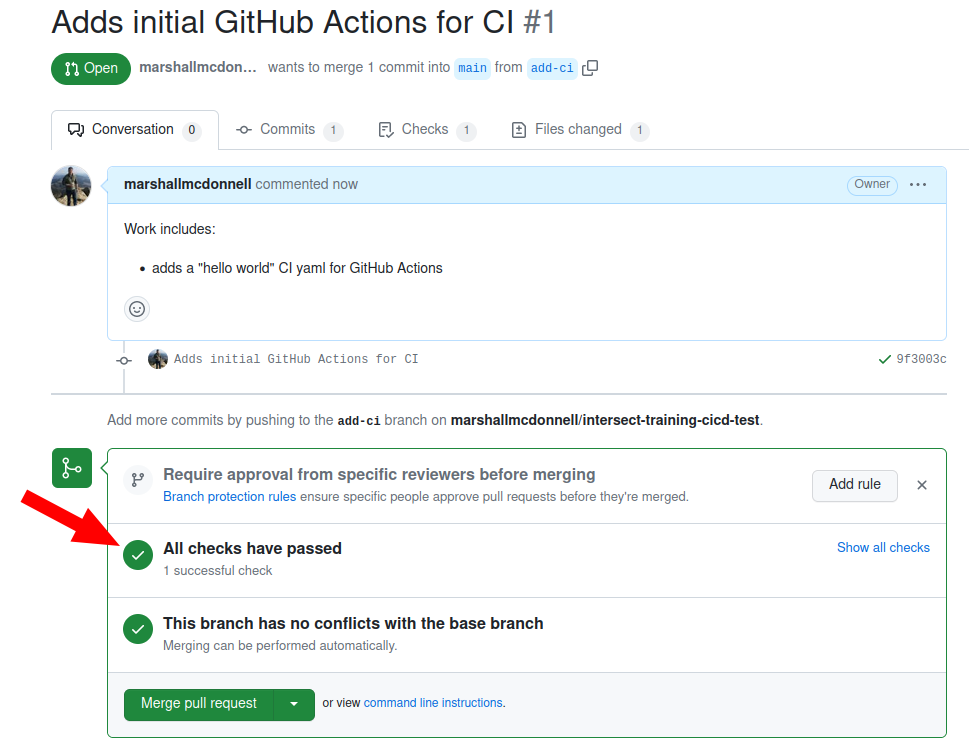
Don’t merge yet!
We will just continue this Pull Request as we continue. Don’t merge into
mainyet.
Key Points
Creating
.github/workflows/main.ymlis the first step to CI/CD.Pipelines are made of jobs with steps.
CI for Python Package
Overview
Teaching: 10 min
Exercises: 10 minQuestions
How do I setup CI for a Python package in GitHub Actions?
Objectives
Learn about the Actions for GitHub Actions
Learn basic setup for Python package GitHub Actions
Setup Python project
For this episode, we will be using some of the material from the INTERSECT packaging carpentry
Setup CI
Now we will switch from setting up a general CI pipeline to more specifically setting up CI for our Python package needs.
But first…
Activity: What do we need in CI for a Python package project?
What are some of the things we want to automate checks for in CI for a Python Package?
What tools accomplish these checks?
Solution
Just some suggestions (not comprehensive):
- Testing passes (pytest for unit testing or nox for parallel Python environment testing)
- Code is of quality (i.e. ruff or flake8 for linting or mccabe for reducing cyclomatic complexity
- Code conforms to project formatting guide (i.e. black for formatting)
- Code testing coverage does not drop significanly (i.e. pytest-cov or Coverage.py)
- Static type checking (i.e. mypy )
- Documentation builds (i.e. sphinx )
- Security vulnerabilities (i.e. bandit)
CI development
When you are first starting out setting up CI, don’t feel you need to add all the checks at the beginning of a project. First, pick the ones that are “must haves” or easier to implement. Then, iteratively improve your pipeline.
Setup Python environment in CI
As of right now, your .github/workflows/main.yml YAML file should look like
name: Code Checks
on: push
jobs:
  greeting:
    runs-on: ubuntu-latest
    steps:
      - name: Greeting!
        run: echo hello world
Overall, we will want to get our CI to run our unit tests via pytest. But first, let’s figure out how to setup a Python environment.
Let’s change the name from example to Code Checks to better reflect what we will be doing.
We will add another job (named test-python-3-10)
and add the steps to setup a Python 3.10 environment to our YAML file:
name: Code Checks
on: push
jobs:
  greeting:
    runs-on: ubuntu-latest
    steps:
      - name: Greeting!
        run: echo hello world

  test-python-3-10:
    name: Check Python 3.10 on Ubuntu
    runs-on: ubuntu-latest
    steps:
      - uses: actions/checkout@v3

      - uses: actions/setup-python@v4
        with:
          python-version: "3.10"
You might be asking: “What is going on with the uses command?”
Here, we are using what GitHub calls “Actions”. These are custom applications that, quoted from the documation link above, “…performs a complex but frequently repeated task.”
Second, you might ask: “Okay… but what is it doing?”
We won’t go into too much detail but mainly, actions/checkout@v3 checks out your code.
This one is used all the time.
GitHub Acions Marketplace
GitHub has what they call a “Marketplace” for “Actions” where you can search for reusable tasks.
There is a Marketplace page for actions/checkout (Marketplace page]) and also a GitHub repository for the source code (GitHub).
The @v3 in actions/checkout@v3 signifies which version of the actions/checkout to use.
So…
Activity: What does the
setup-pythonAction do?What do you think the
actions/setup-pythondoes?Can you find the Marketplace page for
actions/setup-python?Can you find the GitHub repository for
actions/setup-python?Bonus: Can you find a file in the GitHub repo that gives you all the
withoptions?Solution
- This action helps install a version of Python along with other options
- Marketplace: https://github.com/marketplace/actions/setup-python
- GitHub repository: https://github.com/actions/setup-python
- Bonus: This will be in the
actions.yml. Here is the@v4version ofactions.yml: link.
Running your unit tests via CI
We now have our Python environment setup in CI. Let’s add running our tests!
name: Code Checks
on: push
jobs:
  greeting:
    runs-on: ubuntu-latest
    steps:
      - name: Greeting!
        run: echo hello world

  test-python-3-10:
    name: Check Python 3.10 on Ubuntu
    runs-on: ubuntu-latest
    steps:
      - uses: actions/checkout@v3

      - uses: actions/setup-python@v4
        with:
          python-version: "3.10"

      - name: Install package
        run: python -m pip install -e .[test]

      - name: Test package
        run: python -m pytest
We see that we are installing our Python package
with the test dependencies and then running pytest,
just like we would locally.
Let’s push it and see our new CI for Python!
git add .github/workflows/main.yml
git commit -m "Adds Python 3.10 test to CI"
git push
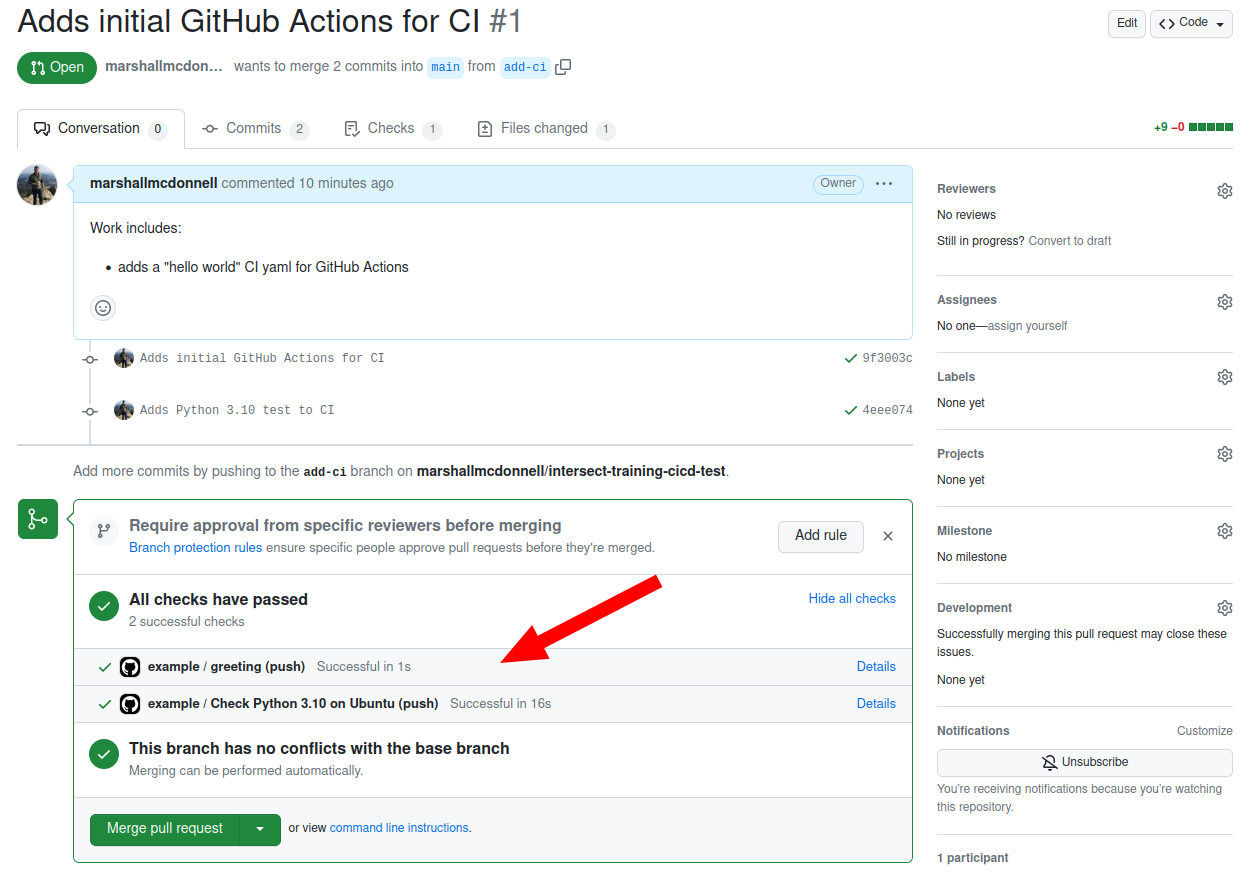
Checkout the results! We see that we now have two jobs running!:
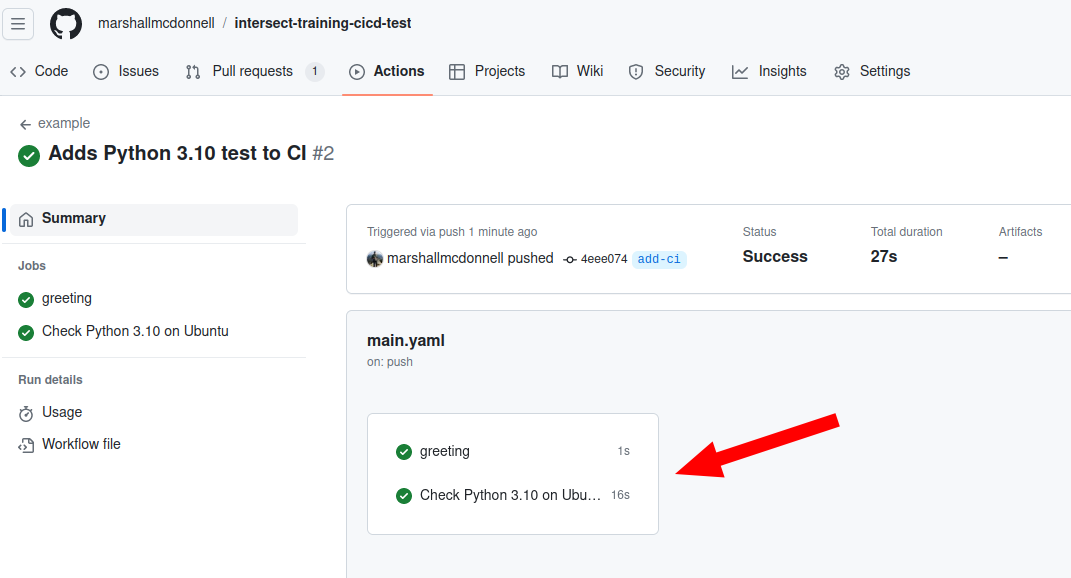
We can see the output / results from running pytest:
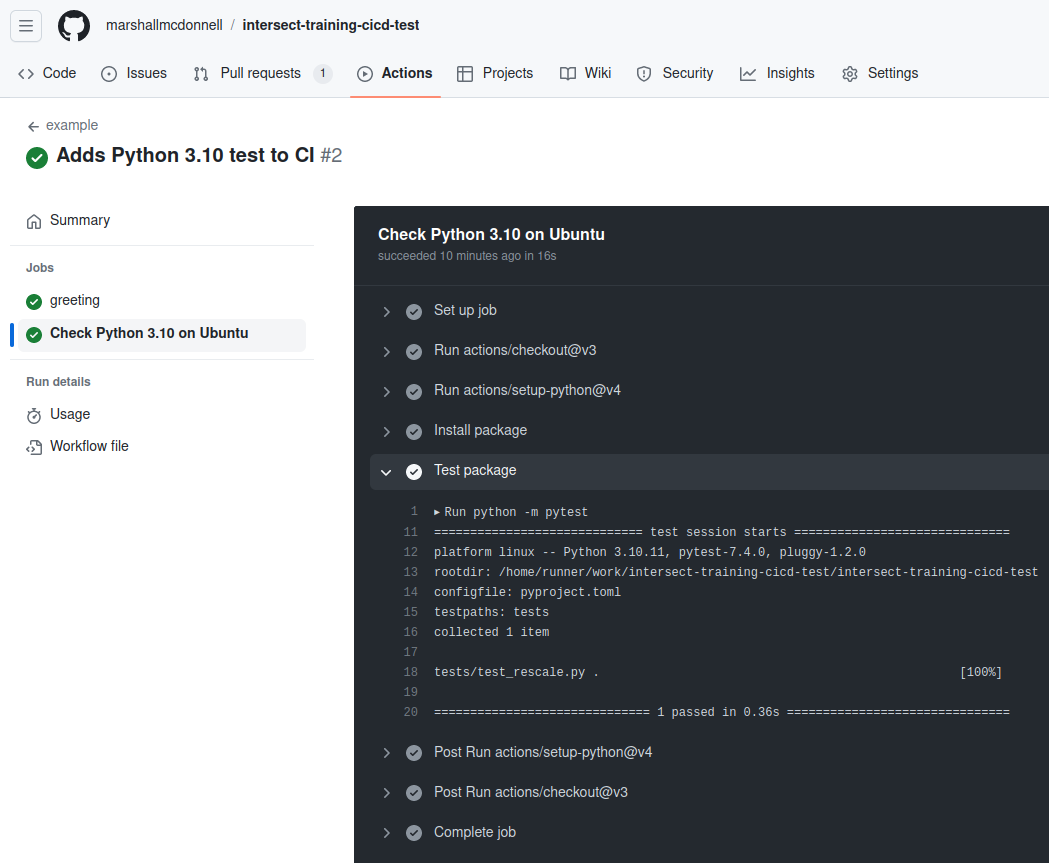
Similarly, we see our open Pull Request has updated dynamically with updates!
Activity: Running multiple jobs
Did the jobs run in sequence or in parallel?
Solution
Parallel. We will discuss this more when we get to the CD section.
Key Points
GitHub has a Marketplace of reusable Actions
CI can help automated running tests for code changes to your Python package
Matrix
Overview
Teaching: 15 min
Exercises: 15 minQuestions
How do I run CI for multiple Python versions and /or different platforms?
Objectives
Don’t Repeat Yourself (DRY)
Use a single job for multiple jobs
Let’s assume our tests are running great.
Yet, the domain scientist reports they are getting errors when they run the Python package.
After talking with them, you find that they are running Python 3.11, not 3.10.
How do we include this version of Python in our testing?
Multiple version Python testing - Naive Approach
One approach would be to add another job to run tests for Python 3.11 as well.
Up to this point, we currently have the following:
name: Code Checks
on: push
jobs:
  greeting:
    runs-on: ubuntu-latest
    steps:
      - name: Greeting!
        run: echo hello world

  test-python-3-10:
    name: Check Python 3.10 on Ubuntu
    runs-on: ubuntu-latest
    steps:
      - uses: actions/checkout@v3

      - uses: actions/setup-python@v4
        with:
          python-version: "3.10"

      - name: Install package
        run: python -m pip install -e .[test]

      - name: Test package
        run: python -m pytest
Let’s add testing a different version of Python in our CI!
Action: Add Python 3.11 test
First, remove the
greetingjob.Then, add a new job called
test-python-3-11.Have this new job:
- Checkout the code
- Setup a Python 3.11 environment
- Install the package with our test dependencies
- Run the tests via
pytestSolution
name: Code Checks
on: push
jobs:

  test-python-3-10:
    name: Check Python 3.10 on Ubuntu
    runs-on: ubuntu-latest
    steps:
      - uses: actions/checkout@v3

      - uses: actions/setup-python@v4
        with:
          python-version: "3.10"

      - name: Install package
        run: python -m pip install -e .[test]

      - name: Test package
        run: python -m pytest

  test-python-3-11:
    name: Check Python 3.11 on Ubuntu
    runs-on: ubuntu-latest
    steps:
      - uses: actions/checkout@v3

      - uses: actions/setup-python@v4
        with:
          python-version: "3.11"

      - name: Install package
        run: python -m pip install -e .[test]

      - name: Test package
        run: python -m pytest
Now, let’s add this so we can catch any Python 3.11 bugs going forward!
git add .github/workflows/main.yml
git commit -m "Adds job to CI for Python 3.11"
git push
Check the output!
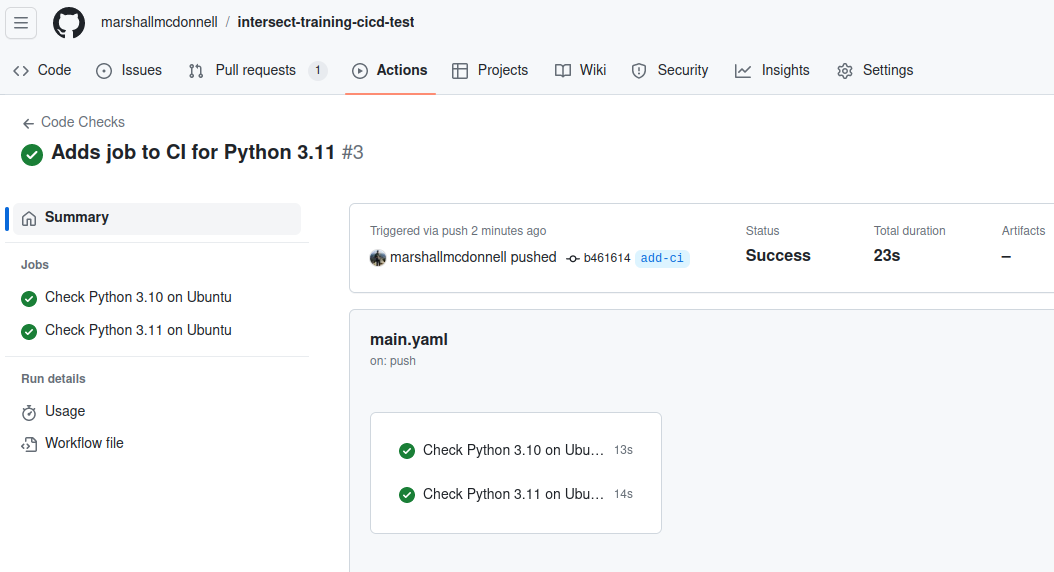
Now, we do technically have multiple-versions of Python supported.
Yet, we just added 13 lines of identical code with only one character change…
DRY your CI
“DRY” is an ancronym for “Don’t Repeat Yourself”, meaning don’t have repeated code in your software. This reduces repetition and avoids redundancy.
We do this for our software. There is no reason we should not apply this principle to CI!
Matrix
Action: Building a matrix across different versions
We could do better using
matrix. The latter allows us to test the code against a combination of versions in a single job.Let’s update our
.github/workflow/main.ymland usematrix.name: Code Checks on: push jobs: test-python-versions: name: Check Python ${{ matrix.python-version }} on Ubuntu runs-on: ubuntu-latest strategy: matrix: python-version: ["3.10", "3.11"] steps: - uses: actions/checkout@v3 - name: Setup Python ${{ matrix.python-version }} uses: actions/setup-python@v4 with: python-version: ${{ matrix.python-version }} - name: Install package run: python -m pip install -e .[test] - name: Test package run: python -m pytestYAML truncates trailing zeroes from a floating point number, which means that
version: [3.9, 3.10, 3.11]will automatically be converted toversion: [3.9, 3.1, 3.11](notice3.1instead of3.10). The conversion will lead to unexpected failures as your CI will be running on a version not specified by you. This behavior resulted in several failed jobs after the release of Python 3.10 on GitHub Actions. The conversion (and the build failure) can be avoided by converting the floating point number to strings -version: ['3.9', '3.10', '3.11'].More details on matrix: https://docs.github.com/en/actions/reference/workflow-syntax-for-github-actions.
We can push the changes to GitHub and see how it will look like.
git add .github/workflows/main.yml
git commit -m "Adds multi-version Python testing to CI via matrix"
git push
That is a much better way to add new versions and we have a DRY-compliant CI!
Test experimental versions in CI
Sometimes in your matrix, you want to push the boundaries of your testing.
An example would be to test up to the latest alpha / beta release of a Python version.
You do not want a failure in such cutting-edge, unstable tests stopping your CI.
At time of writing, the latest supported beta version of Python for the actions/python-versions is 3.12.0-beta.4 based on their GitHub Releases.
Let’s add this to our python version testing.
Allow experimental jobs to fail in CI
This gets a little complicated, but there are a few flags we need to set.
GitHub Actions will cancel all in-progress and queued jobs in the matrix if any job in the matrix fails.
To disable this, we need to disable fail-fast in the matrix strategy.
strategy:
  fail-fast: false
That should do it, right? Nope…
We have to add continue-on-error: true to a single job that we allow to fail.
If enabled, jobs in the matrix continue to run if there is an error.
By default continue-on-error: false and will also cancel the matrix jobs if the
“experimental” job fails.
runs-on: ubuntu-latest
continue-on-error: true
More details: https://docs.github.com/en/actions/using-workflows/workflow-syntax-for-github-actions#jobsjob_idstrategyfail-fast
Finally, we need to add this experimental job to the matrix. Also, we need to flag it as “allowed to fail” somehow.
For this, we use include to add a single extra job to the matrix with “metadata”.
strategy:
  matrix:
    include:
      - python-version: "3.12.0-beta.4"
        allow_failure: true
This will add the string "3.12.0-beta.4" to the python-version
list in matrix with the arbitrary variable allow_failure set to true
as “metadata”.
We also must add the allow_failure “metadata” to the other members of the matrix (see below).
More detail: https://docs.github.com/en/actions/using-workflows/workflow-syntax-for-github-actions#jobsjob_idstrategymatrixinclude
Putting it together for Python experimental job…
So if we only want to allow the job with version set to
3.12.0-beta.4to fail without failing the workflow run, we need something like:Then the following would work for a job:
jobs:
  job:
    runs-on: ubuntu-latest
    continue-on-error: ${{ matrix.allow_failure }}
    strategy:
      fail-fast: false
      matrix:
        python-version: ["3.10", "3.11"]
        allow_failure: [false]
        include:
          - python-version: "3.12.0-beta.4"
            allow_failure: true
Action: Add experimental job that is allowed to fail in the matrix
Add “3.12.0-beta.4” to our current Python package CI YAML via the matrix but allow it to fail.
Solution
name: Code Checks
on: push
jobs:

  test-python-versions:
    name: Check Python ${{ matrix.python-version }} on Ubuntu
    runs-on: ubuntu-latest
    continue-on-error: ${{ matrix.allow_failure }}
    strategy:
      fail-fast: false
      matrix:
        python-version: ["3.10", "3.11"]
        allow_failure: [false]
        include:
          - python-version: "3.12.0-beta.4"
            allow_failure: true

    steps:
      - uses: actions/checkout@v3

      - name: Setup Python ${{ matrix.python-version }}
        uses: actions/setup-python@v4
        with:
          python-version: ${{ matrix.python-version }}

      - name: Install package
        run: python -m pip install -e .[test]

      - name: Test package
        run: python -m pytest
Let’s commit this and see how it looks!
git add .github/workflows/main.yml
git commit -m "Adds experimental Python 3.12.0-beta.4 test to CI"
git push -u origin add-ci
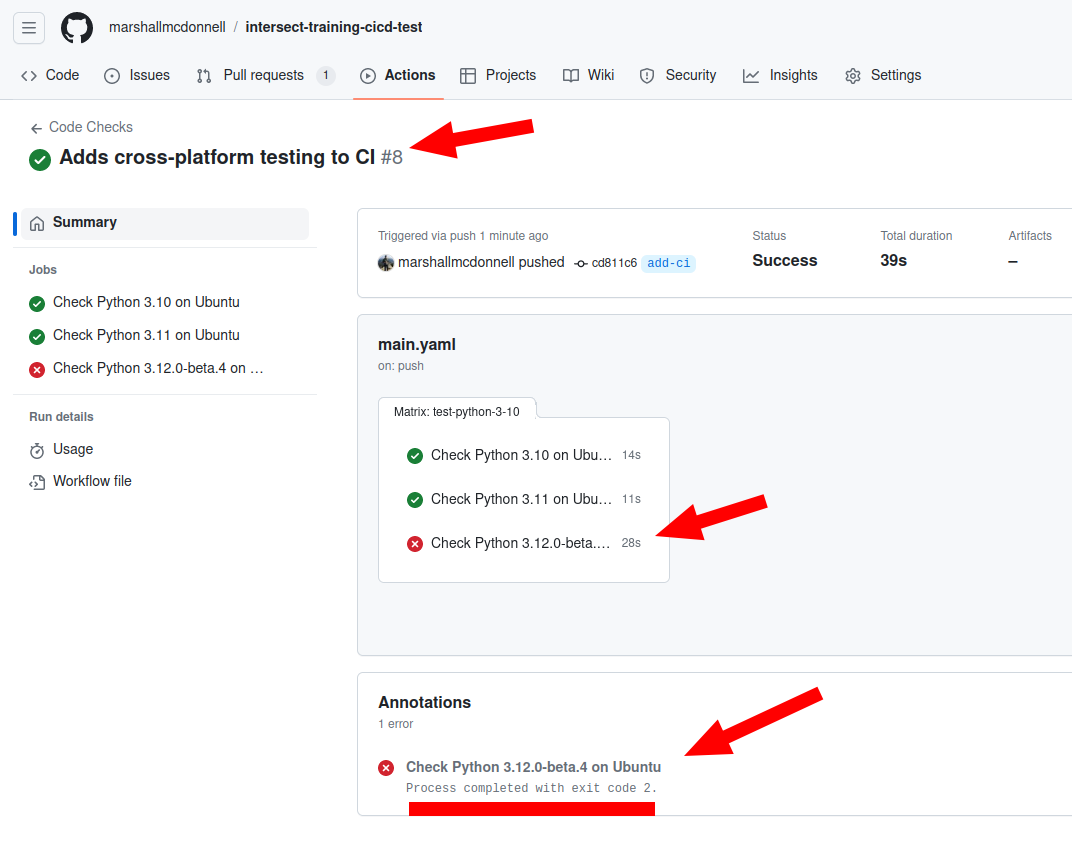
We see that the overall workflow passed even though the Python 3.12.0-beta.4 job failed!
Also, note that we see that GitHub Actions reports an exit code that is non-zero! Like previously discussed, exit codes are what CI tools / solution are built around.
Experimental CI jobs
This allows us to run all kinds of “experimental” jobs. Examples are trying new versions of software or checking deprecated versions.
Cross-platform testing
Uh oh… the domain scientist is back with an issue.
After talking with him, you find out his summer intern cannot run the python package on their Windows machine.
You have Linux Ubuntu and your domain scientist collaborator / team member has Mac.
How do we test our Python package across Linux, Mac, and Windows (i.e. cross-platform)?
Selecting the GitHub-hosted runner platform
We honestly already have what we need, the runs-on command!
All we need to know is what values are allowed.
Inside of the runs-on documentation, there is a list of labels we can use to select the platform of the runner: list of labels for runner types
Action: Find out the labels for all three platforms
Using the documentation links above, get the three “latest” labels for Linux, Mac, and Windows.
Solution
- Linux:
ubuntu-latest- Mac:
macos-latest- Windows:
windows-latest
Using these labels, we could create the following setup to run on all three platforms!
jobs:
  test:
    runs-on: [ubuntu-latest, macos-latest, windows-latest]
Not necessarily the best practice to use “latest”…
It is arguable but… using “latest” versions for the platforms may not be the best practice. This practice is essentially testing versions of the platforms that will change, eventually, when the newest OS platform version is created for “latest”.
This leaves you vulnerable to your CI breaking due to no change to the code.
However, this is a very infrequent change and probably fine to stay with “latest” so you don’t have to change when the other eventual change will occur: a pinned version of the OS platform is deprecated and no longer available!
Action: Add cross-platform testing to CI YAML
Using the “latest” labels, add Linux, Mac, and Windows testing to our current CI YAML.
HINT: You will need a variable under
matrixthat you use forruns-onand also for theinclude.Solution
name: Code Checks
on: push
jobs:

  test-python-versions:
    name: Check Python ${{ matrix.python-version }} on ${{ matrix.runs-on }}
    continue-on-error: ${{ matrix.allow_failure }}
    runs-on: ${{ matrix.runs-on }}
    strategy:
      fail-fast: false
      matrix:
        runs-on: [ubuntu-latest, windows-latest, macos-latest]
        python-version: ["3.10", "3.11"]
        allow_failure: [false]
        include:
          - python-version: "3.12.0-beta.4"
            runs-on: ubuntu-latest
            allow_failure: true

    steps:
      - uses: actions/checkout@v3

      - name: Setup Python ${{ matrix.python-version }}
        uses: actions/setup-python@v4
        with:
          python-version: ${{ matrix.python-version }}

      - name: Install package
        run: python -m pip install -e .[test]

      - name: Test package
        run: python -m pytest
Let’s push these changes and see how it goes!
git add .github/workflows/main.yml
git commit -m "Adds cross-platform testing to CI"
git push
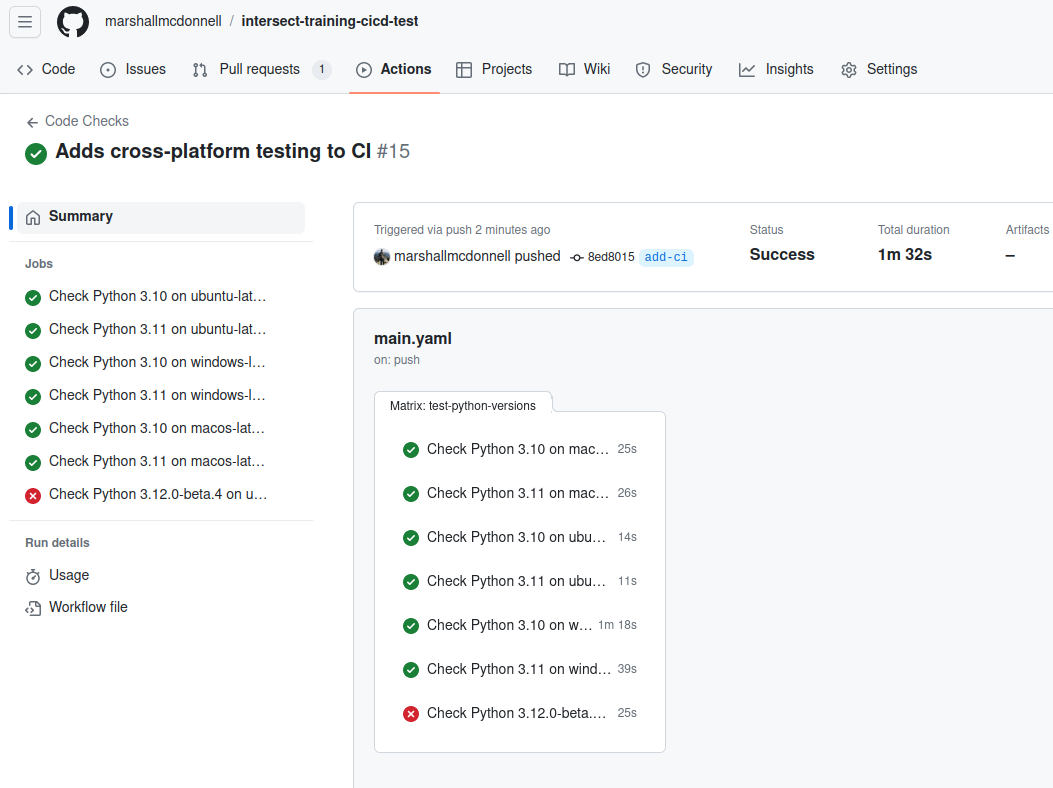
We see that now we are also testing across all the platforms!
Pull Request
That wraps up the CI portion for the Python package.
If you’d like, you can add more steps to the jobs to perform other checks (i.e. linting, format checks, documentation builds, etc.)
Once you are happy, let’s use our open pull request for this branch and get it merged back into main!
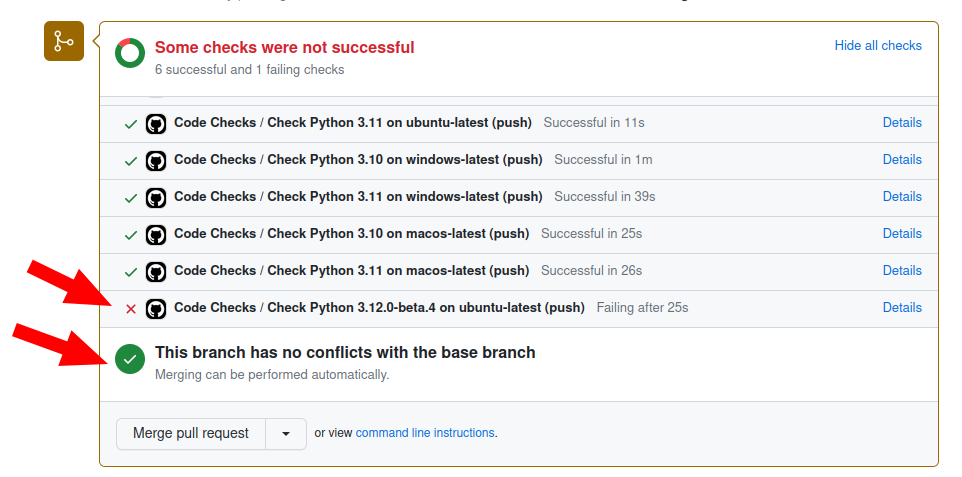
You’ll notice that the Pull Request shows us that a CI check didn’t pass but the overall workflow passed and able to be merged in!
Clean up local repository
To get your local repository up-to-date, you can run the following:
git checkout main
git pull
git remote prune origin # prune any branches deleted in the remote / GitHub that are still local
git branch -D add-ci # optional
Key Points
Matrix can help DRY your CI for multi-version and cross-platform testing
Using
matrixallows to test the code against a combination of versions.
CD for Python Package
Overview
Teaching: 15 min
Exercises: 15 minQuestions
How do I setup CD for a Python package in GitHub Actions?
Objectives
Learn about building package using GitHub Actions
Learn what is required to publish to PyPi
We have CI setup to perform our automated checks.
We have continued to add new features and now, we want to get these new features to our Users.
Just as we have automated code checks, we can automated deployment of our package to a package registry upon a release trigger.
Setup CD for Releases
We previously created our CI workflow YAML file.
We could keep using that one, possibly.
However, we previously were triggering on every single push event
(i.e. anytime we uploaded any commits to any branch!)
Trigger for CD
Do we want to publish our Python Package for any pushed code? Definitely not!
We want to instead pick the trigger event and create a new GitHub Actions YAML just for our CD workflow.
There are different triggers we can use:
- any tags pushed to the repository
on:
  push:
    tags:
      - '*'
- tags that match semantic version formatting (below is a regular expression used to match a pattern of text)
on:
  push:
    tags: 'v[0-9]+.[0-9]+.[0-9]+-*'
- manually triggered from UI and / or on GitHub Releases
on:
  workflow_dispatch:
  release:
    types:
      - published
Let’s continue using the “releases” one.
The first, workflow_dispatch, allows you to manually trigger the workflow from the GitHub web UI for testing.
The second, release, will trigger whenever you make a GitHub Release.
Now that we have our triggers, we need to do something with them.
We want to push our Python Package to a package registry.
But first, we must build our distrbution to upload!
Build job for CD
Let’s start on our new CD YAML for releases.
Write the following in .github/workflows/releases.yaml
name: Releases

on:
    workflow_dispatch:
    release:
      types:
        - published

jobs:
  dist:
    runs-on: ubuntu-latest
    steps:
    - uses: actions/checkout@v3

    - name: Build SDist & wheel
      run: pipx run build

    - uses: actions/upload-artifact@v3
      with:
        name: build-artifact
        path: dist/*
Here we have a job called “dist” that:
- Checks out the repository using the
actions/checkoutAction again. - Uses pipx to run the build of the source (SDist) and build (wheels) distrubtions. This produces the wheel and sdist in
./distdirectory. - Use a new Action, called
actions/upload-artifact(Markplace page)
From the actions/upload-artifact Markplace page, we can see this saves artifacts between jobs by uploading and storing them in GitHub.
Specifically, we are uploading and storing the artifacts from the ./dist directory in the previous step and naming that artiface “build-artifact”. We will see, this is how we can pass the artifacts to another job or download ourselves from the GitHub UI.
This gives us our first step in the CD process, building the artifacts for a software release!
Test using build artifacts in another job
Now, we want to take the artifact in the dist job and use it in our next phase.
To do so, we need to use the complimentary Action to actions/upload-artifact, which is action/download-artifact`.
From the Marketplace page, we can see this simply downloads the artifact that is stored using the path.
Let’s add a “test” publish job.
name: Releases

on:
    workflow_dispatch:
    release:
      types:
        - published

jobs:
  dist:
    runs-on: ubuntu-latest
    steps:
      - uses: actions/checkout@v3

      - name: Build SDist & wheel
        run: pipx run build

      - uses: actions/upload-artifact@v3
        with:
          name: "build-artifact"
          path: dist/*

  publish:
    runs-on: ubuntu-latest
    steps:
      - uses: actions/download-artifact
        with:
          name: "build-artifact"
          path: dist

      - name: Publish release
        run: echo "Uploading!"
Using the above test YAML, let’s upload this and perform a release to run the CD pipeline.
First, checkout a new branch for CD from main.
git checkout -b add-cd
git add .github/workflows/releases.yml
git commit -m "Adds build + test publish to CD"
git push -u origin add-cd
Go ahead and merge this in main as well.
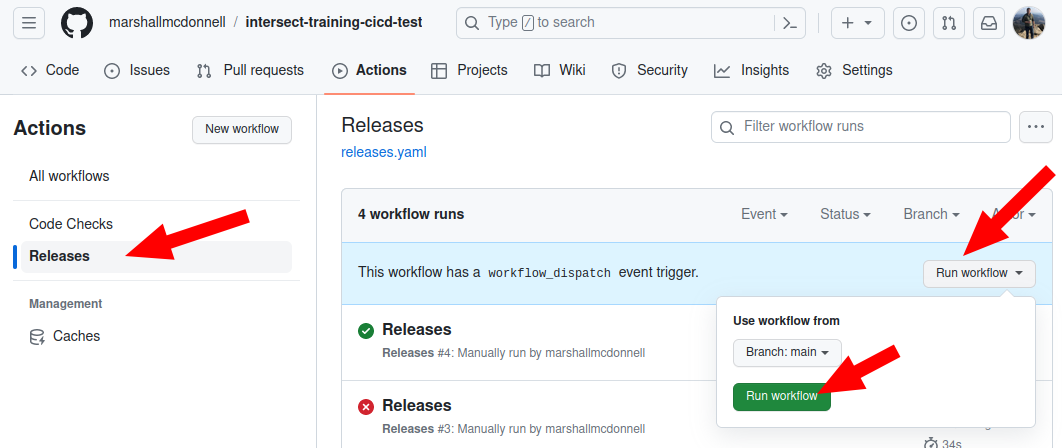
Then, let’s go into the Actions tab and run the Release job from the UI:
Action: Test out the publish YAML
Does the CD run successfully?
Solution
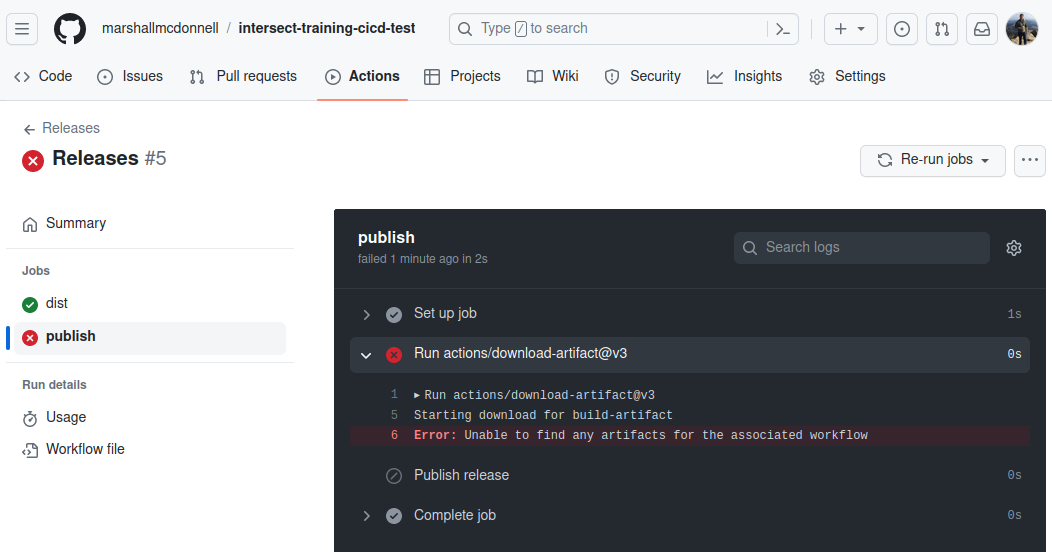
Nope!
The
distjob passes but thepublishjob fails. Thepublishjob cannot fine the artifact.
We previously asked about jobs running in sequence or parallel.
By default, jobs run in parallel.
Yet, here, we clearly need to operate in sequence since the build must occur before the publish.
To define this dependency, we need the needs command.
From the documentation, needs takes either a previous job name or a list of previous job names that are required before this one runs:
jobs:
  job1:
  job2:
    needs: job1
  job3:
    needs: [job1, job2]
Let’s add a “test” publish job.
Action: Test out the publish YAML - Take 2!
Re-write the current YAML using
needsto fix the dependency issue. Mainly, we need to specify that thepublishjobneedsthedistjob to run first.Solution
name: Releases

on:
  workflow-dispatch:
  release:
    types:
      - published

jobs:
  dist:
    runs-on: ubuntu-latest
    steps:
      - uses: actions/checkout@v3

      - name: Build SDist & wheel
        run: pipx run build

      - uses: actions/upload-artifact@v3
        with:
          name: "build-artifact"
          path: dist/*

  publish:
    needs: dist
    runs-on: ubuntu-latest
    steps:
      - uses: actions/download-artifact
        with:
          name: "build-artifact"
          path: dist

      - name: Publish release
        run: echo "Uploading!"
Let’s add these changes and push!
git add .github/workflows/releases.yml
git commit -m "Fixes build + test publish to CD"
git push
Perform another manual run for the Releases workflow and check the results!
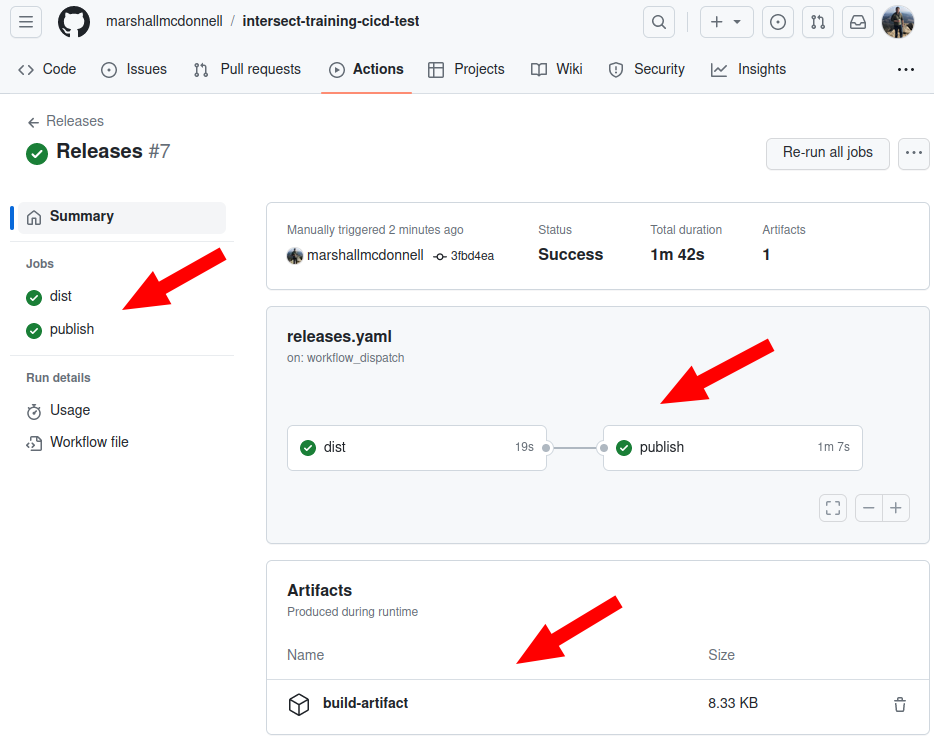
We have a successfful pipeline with the proper dependencies and the artifacts!
We are ready to swap out the test publishing step with a more realistic example.
Publish to Test PyPi package repository
Instead of creating a “production” version in PyPi, we can use Test PyPi instead.
Get API token from TestPyPi -> GitHub Actions
Notice: The following requires createing an account on TestPyPi, putting secrets in the GitHub repository, and uploading a Python package to TestPyPi.
If you do not feel comfortable with these tasks, feel free to just read along
To setup using TestPyPi, we need to:
- Register for an account on TestPyPi
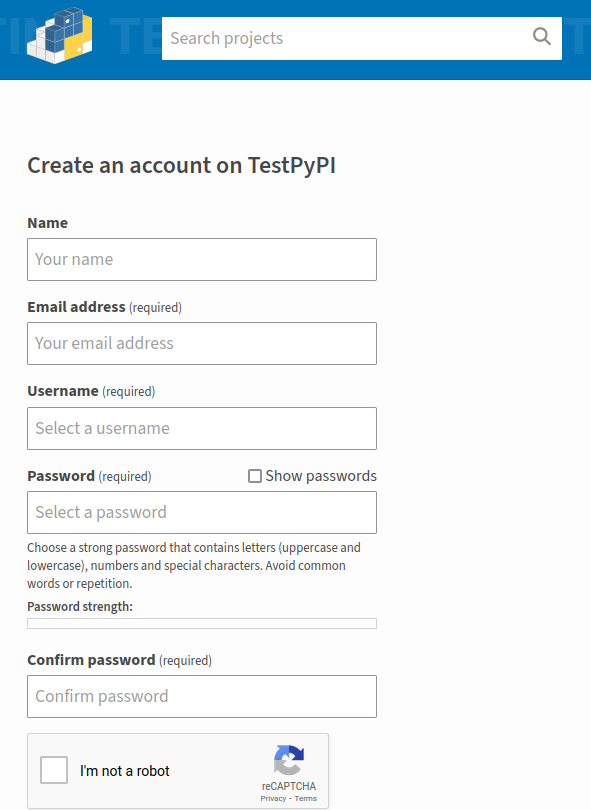
- Get an API token so we can have GitHub authenticate to TestPyPi on our behalf. Go to the TestPyPi and get an API token

- Go to
Settings->Secrets->Actionsin the GitHub UI
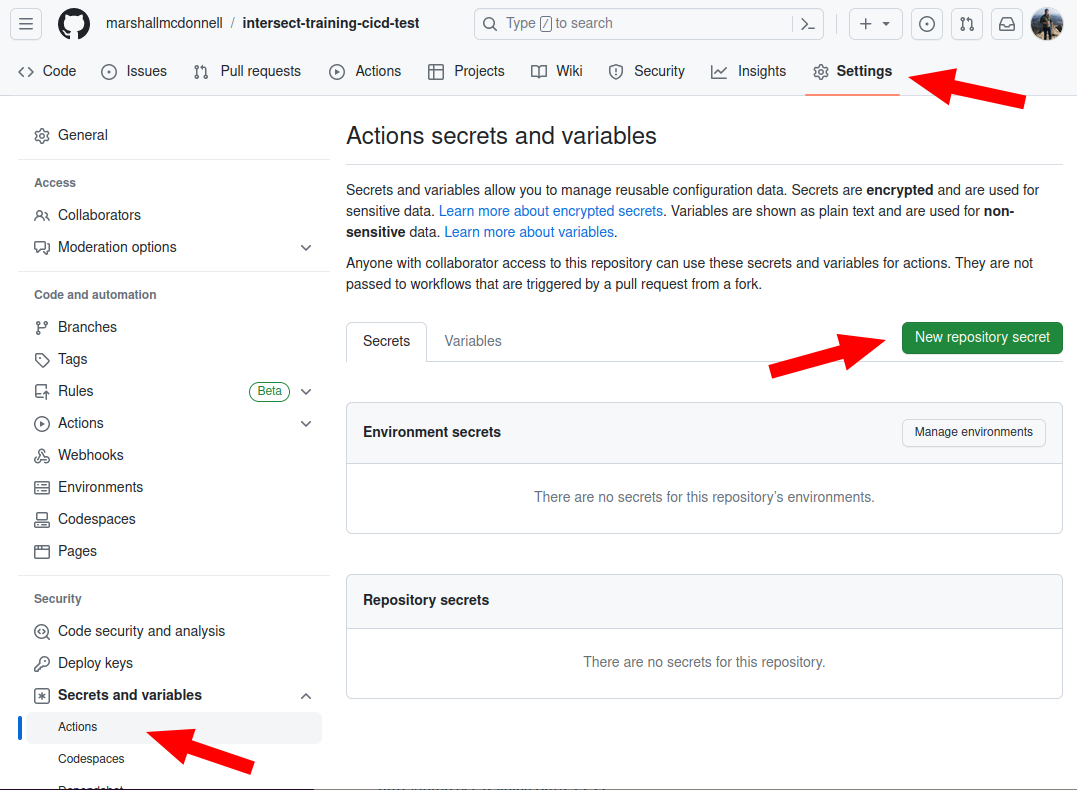
- Add the TestPyPi API token to GitHub Secrets (call it
TEST_PYPI_API_TOKEN)
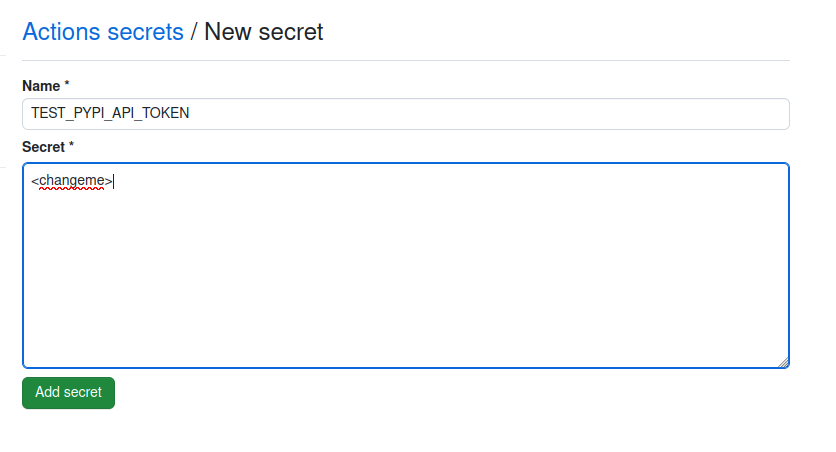
Now that we have the credentials in GitHub for our PyPi package repository, let us write out the YAML.
Setup CD for publishing to TestPyPi
For GitHub Actions, we can use the Action actions/gh-action-pypi-publish.
Mainly, we need the following to replace our test publish step:
  - uses: pypa/gh-action-pypi-publish@release/v1
    with:
      password: $
      repository-url: https://test.pypi.org/legacy/
The secrets is a way to gain access to and pull in secrets stored in GitHub into CI/CD using GitHub Actions.
DISCLAIMER
Since we will be trying to upload a package, we might get a “clash” with an existing name. If so, change the name of the project to something unique in the pyproject.toml.
After uploading the following, commiting the changes, and doing a “release”, you will see something like the following:
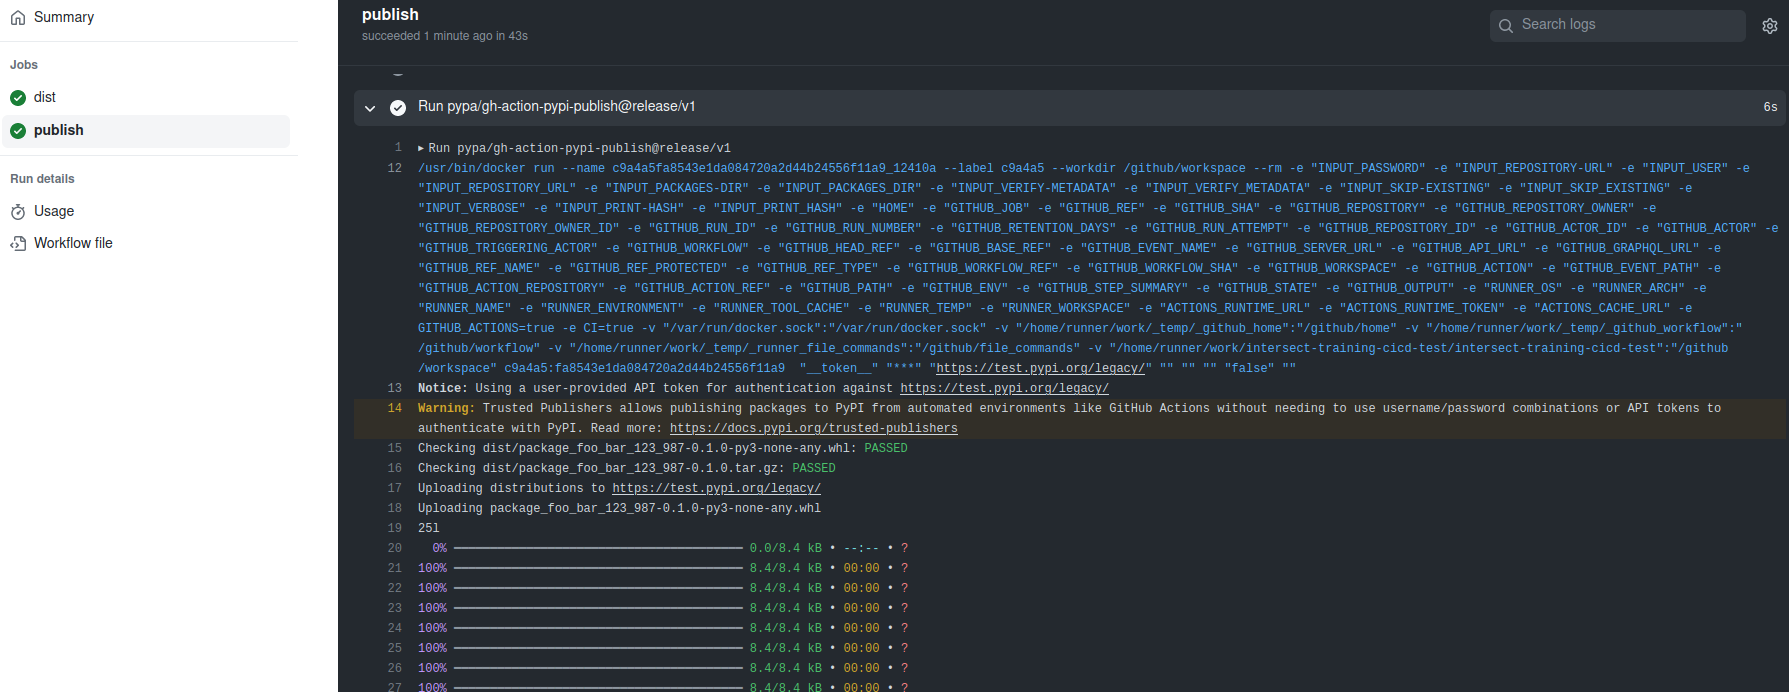
Also, you can go to your projects page and be able to see the new package show up!
Wrap up
Now, we have CD setup for a Python package to a PyPi registry!
Feel free to change out the triggers, switch to PyPi, or add multiple PyPi repositories for deployment.
Key Points
GitHub Actions can also help you deploy your package to a registry for distribution.
Badge for CI/CD
Overview
Teaching: 5 min
Exercises: 0 minQuestions
How to add something that communicates / visualizes the status of CI/CD?
Objectives
Add a badge to project for CI/CD status
Badges
As you run CI, you do see the current status of CI/CD for feature branches in pull requests.
You can also check the status via navigating to the Actions tab in GitHub.
Yet, for the main branch or other “important” branches for your team,
wouldn’t you like to bring more visibility to the status of CI?
Like a monitor to tell you if it is broken or not? (maybe yes, maybe no…)
If you do, badges are a very easy way to communicate things about your project to your team and others and can easily be put in your markdown README files!
Badges
Badges are not specific to CI/CD.
You can create ones for which Python versions you use, what license you have, or what the current version is of your released software.
Shields.io is a great resource to create all kinds of badges that you can then add to your README or other markdown.
Yet, for CI/CD, GitHub Actions already provides this badge for you, you just need to know what to add to your README.
The GitHub Actions badges has the following template to create badges in your README markdown files! Just replace:
- OWNER
- REPOSITORY
- YAML

Example:

Which will give you something like:

If you like, feel free to add one to your repository.
Key Points
Badges are fun!
(Bonus) Discuss CI/CD for Documentation
Overview
Teaching: 5 min
Exercises: 0 minQuestions
What is the documetation artifact and what does CI/CD look like for this?
Objectives
Figure out the CI/CD for documentation
Next, we will discuss another artifact from software we can setup CI / CD for: container images!
Documentation artifacts
In our example repository, we have our documentation source code in docs/.
Using sphinx, you can “build” the documentation. Similar to our Python package, the output of the documentation build is an artifact. Yet, it is not an installable package that we output.
Action: What are the artifacts for documentation?
When you access documentation for some of your favorite softwares, what form is it in? Which is your favorite form of documentation?
Examples
- Websites, like on [ReadTheDocs][rtd] (example: NumPy docs)
- PDF files (example: RMCProfile v6.7.4 docs)
- API documentation like [Swagger / OpenAPI][openapi] for Software-as-a-Service (example: Arcsecond Swagger or GitHub REST API docs)
What do we want from CI/CD for Sphinx documentation?
Sphinx will allow for multiple output formats (i.e. PDF or website).
Arguably, the website format is the favorite. For this, Sphinx can generate HTML files that can be used to create a [static webpage][static-page]
As we discussed in the first episode, we can use CI / CD for all sorts of stuff. We just need to ask the questions:
- “What workflow am I trying to automate?”
- For CI: “What does ‘breaking changes’ mean for my workflow?”
- For CD: “What does deployment / delivery / release mean for my workflow?
Action: Answer these questions for our documentation workflow
Considering we use sphinx to create files and want a documentation webpage, what are your answers to the questions above?
- For CI, what will we automate and check for documentation?
- For CD, what will we be deploying for documentation?
Solution
- For CI: we want to automate building the documetation HTML files
- For CD: we want to automatically publish the artifact for the static webpage and, eventually, deploy it onto a web server.
For documentation CI/CD, we do need to think about the end goal.
Basically, if we aren’t using services like [ReadTheDocs][rtd], we need to run a web site on a web server.
So the HTML files could be considered the final artifact. Yet, there is a “nicer” solution for software artifacts that have gained immense popularity do to their ease of deployment and reproducibility!
To be revealed in the next episode…
Key Points
Documentation and website artifacts are different than package artifacts
(Bonus) Quick primer on Containers
Overview
Teaching: 10 min
Exercises: 0 minQuestions
What is a container and why would I want to publish one?
Objectives
Learn high-level overview of containers
Learn what applications fit better for containerization
Containers
Containers are your packaged software application together with dependencies. This sounds like a packaged library but these are different. Containers serve more like executables and run very “isolated” from the system they are run on. They bundle together such things like specific versions of programming language runtimes and libraries required to run.
Some of the typical benefits advertised for containers is:
- very portable
- lighweight (relative to things like virtual machines)
- application isolation on a system
They are very popular in any web-based software like websites, databases or software services (i.e. REST APIs)
And they can be used for documentation websites!
Difference between “Container” and “Container Image”
So you might say “Okay, we are going to make a container as our documentation software artifact, right?”
Not exactly… we are going to make a container image.
The difference is that a container image is built, usually from another base container image like base OS images (i.e. Ubuntu and Windows Server for operating systems and NGINX for web servers)
Then containers are created from container images, with runtime modifications appied for each individual container. So two containers could come from the same container image but would differ by the environmental variables that are set for each or different data put inside each container.
An analogy is there is one version of Windows 11 operating system. It is installed on many Windows computers around the world.
Yet, each individual Windows computer far from identical since people modify their personal computers: different backgrouns, different files on them, different CPU resources for each computer.
So the artifact we want to produce is a container image.
Then, the User of the documentation container image can modify it at runtime, such as web server configurations.
Docker
One of arguably the most popular container image tools is Docker.
Docker is widely used by developers to create software artifacts for web-based applications. They are also super handy for development like in testing with multiple software services (i.e. run with a database, a software service, and a website locally on your machine).
We will go over very, very little about using Docker in this lesson. There are other Carpentries which do go over using Docker for scientific computing for the interested reader.
What we will need
The very high-level Docker understanding we need is:
- A container image is created in Docker using a
Dockerfile: a file that defines the container image build- The command
docker build --file Dockerfile --tag <name of image> .(or shorthand,docker build -t <name of image> .) will build the container image- The command
docker run <name of image>will spin up a container from the container image and run it
We will simply be using Docker as a sort of “blackbox” tool to help perform our CI/CD operations in GitHub Actions for documentation artifact:
- Build the documentation in a container image
- Publish the container image ready to run our documentation server
- (not covered here) Deploy this container on a server, cloud-service, or container orchestration platform to serve our documentation to the Users.
DockerHub
We discussed containers vs. container images. And we stated that container images are the artifact we want to produce. Yet, where to we put this artifact?
We had PyPi for Python packages.
For Docker and container images, we mainly have DockerHub
DockerHub is called a container image registry. We can “push” our container images to DockerHub for others to be able to “pull” them down to re-use them.
DockerHub is not the only container image registry software. It is probably the most popular. But for now, you can consider it equivalent to PyPi but for containers instead of Python packages.
What we will need
The very high-level Docker understanding we need is:
- After building an image, we can put it in a container image registry via
docker push <name of image>- We can retrieve an image from a container image registry via
docker pull <name of image>- We can rename a contianer image via
docker tag <original tag> <new tag>
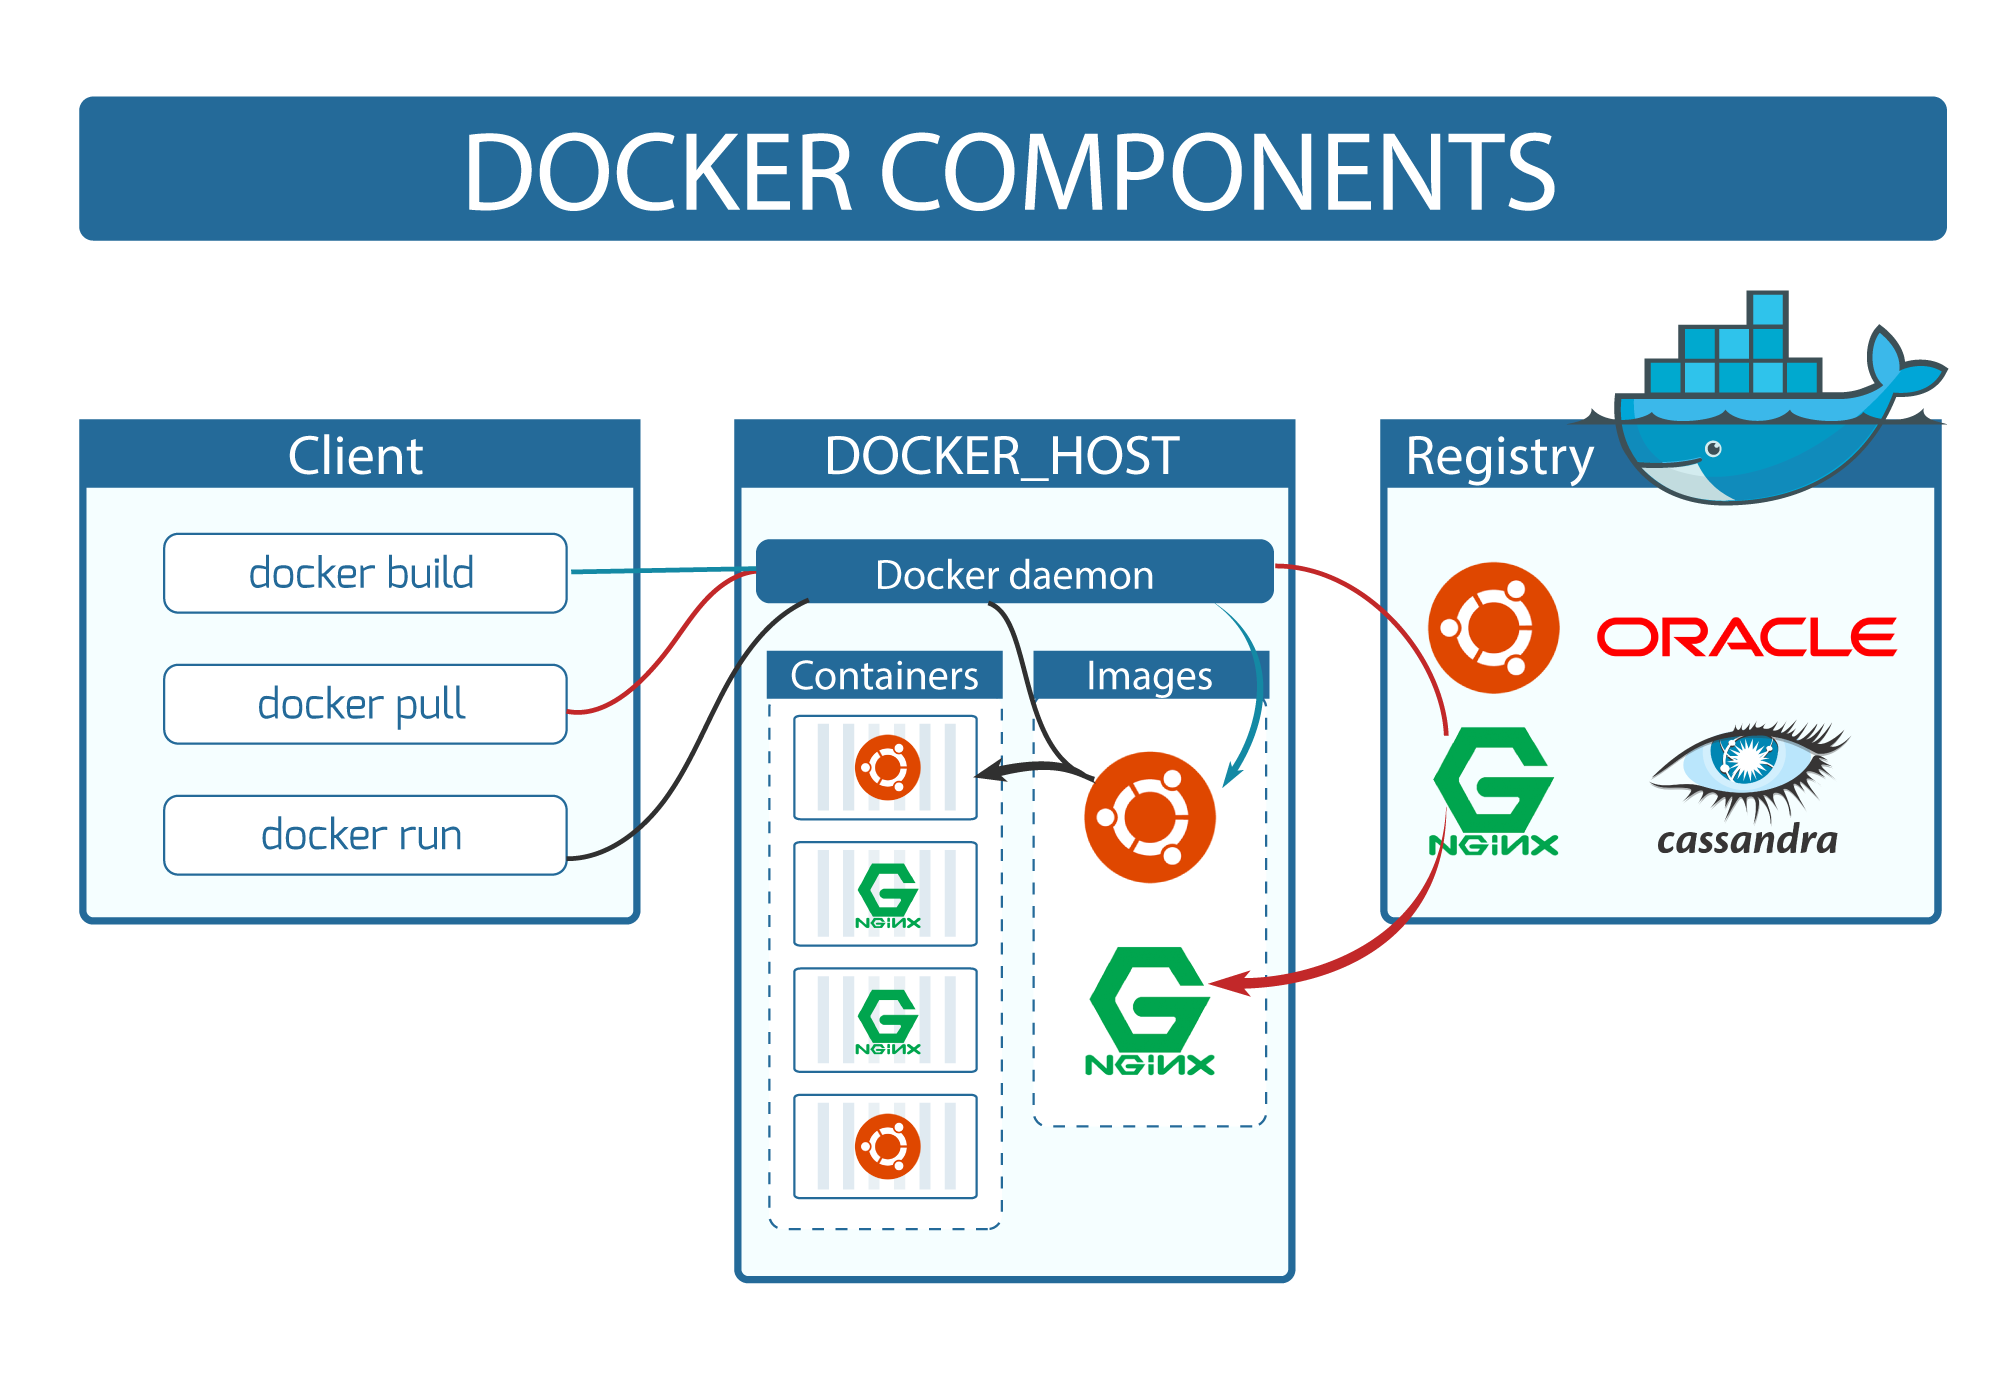
Overall Docker Architecture
This graphic helps illustrate what we are doing with our docker build, docker run, docker pull and docker push commands we will be using:
Wrap up
Now we have an idea of what we what to do for documentation CI/CD and a tool to use for performing these operations (Docker).
Next, we will take these together and attempt to publish a container image as a documentation artifact.
Key Points
Containers are a very common packaging artifact for web-based applications
(Bonus) Implementing CI/CD for documentation using containers
Overview
Teaching: 10 min
Exercises: 10 minQuestions
How to setup CI/CD for documentation using containers?
Objectives
Setup a CI and CD workflow for container images using GitHub Actions
Learn about the GitHub Container Image Registry
Knowing about containers and how we want to create a container image, we will dive into implementing CI/CD for our documentation using Docker.
We won’t be running these commands locally so you do not need Docker installed. We will just created the GitHub Actions YAML file to let CI/CD run it instead.
If you do have docker installed, feel free to run these commands locally. It is just not required.
Setup CI for documentation
The main job we need for CI is to build the container image for the documentation.
We can accomplish this simply with Docker via:
docker build -t my-docs .
So let us add this to our CI YAML. Luckily, Docker is already installed on the GitHub Actions runners!
If not already in the project directory, go ahead and get there. We will make our feature branch:
cd intersect-training-cicd
git checkout main
git pull
git checkout -b add-docs-cicd
We will create a new .github/workflows/docs-ci.yml file in the project.
Open .github/workflows/docs-ci.yml with your favorite editor and add the following
name: Documentation CI
on: push
jobs:
  build-docs-using-docker:
    runs-on: ubuntu-latest
    steps:
      - uses: actions/checkout@v3

      - name: Build docs via Docker
        run: docker build -t my-docs .
NOTE: Don’t forget the . at the end of the docker build -t my-docs . command! That tells the build command which directory to use.
Let’s push this to the repository and see what happens!
git add .github/workflows/docs-ci.yml
git commit -m "Adds job to build docs in CI via docker"
git push -u origin add-docs-cicd
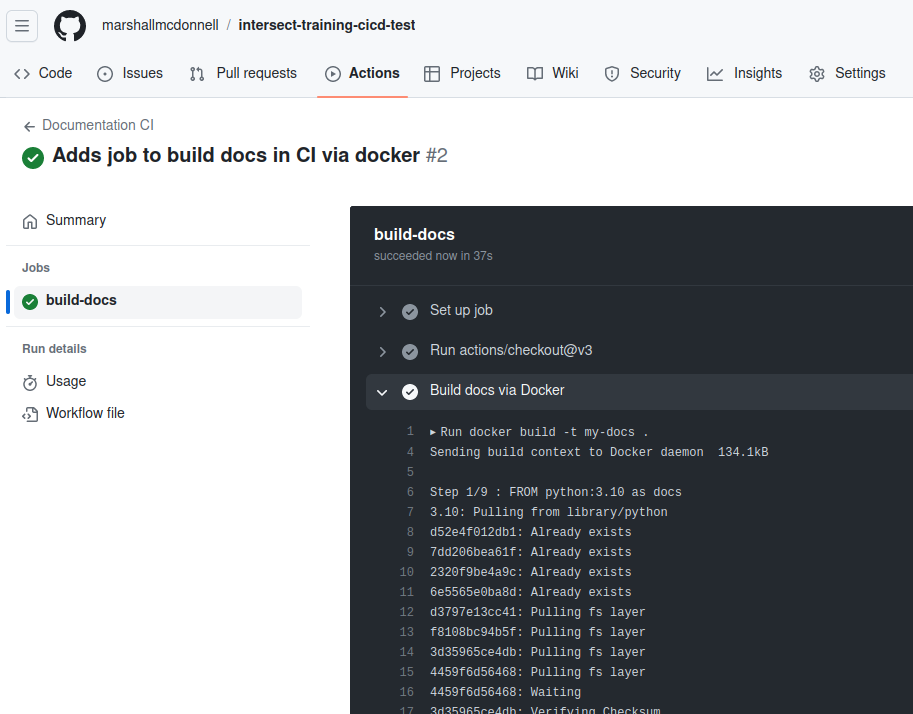
So we are successfully building our container image in CI!
Now, we need to publish this image via CD. This is equivalent to pushing the container image to a container image registry.
GitHub Container Image Registry
We won’t be using the DockerHub container image registry.
Instead, we will use GitHub’s built-in GitHub Container Image Regsitry (GHCR). Similar to one reason why we choose GitHub Actions for CI/CD, GitHub can integration with GHCR without requiring 3rd party credentials to be shared, like we did with TestPyPi.
Also, it is free! DockerHub is as well, mostly.
Setup CD for documentation
As before, we need the trigger setup for the publish / releases.
We can re-use what we previously had for the Python package CD trigger:
on:
    workflow_dispatch:
    release:
      types:
        - published
For the jobs, we will do a build and push of the container image on Releases.
We will heavily rely on existing Actions in GitHub to accomplish this:
docker/setup-buildx-action: Sets up Docker for us on the runner Marketplacedocker/login-action: Logs into container registries using runner credentials Marketplacedocker/build-push-action: Builds and pushes image to container registry. Marketplace
Open .github/workflows/docs-cd.yml with your favorite editor and add the following:
name: Documentation CD
on:
    workflow_dispatch:
    release:
      types:
        - published

jobs:
  publish-docs-using-docker:
    runs-on: ubuntu-latest
    permissions:
      packages: write
    steps:
      -
        name: Checkout
        uses: actions/checkout@v3

      -
        name: Set up Docker Buildx
        uses: docker/setup-buildx-action@v2

      -
        name: Login to GitHub Container Registry
        uses: docker/login-action@v2
        with:
          registry: ghcr.io
          username: $
          password: $

      -
        name: Build and push catalog image
        uses: docker/build-push-action@v4
        with:
          context: .
          push: true
          platforms: linux/amd64,linux/arm64
          tags: ghcr.io/$:$
A few things to note:
- The
permissions:packages:writeis important to allow this job to write to [GitHub Packages][github-packages], which the container registry is part of. - In
docker/login-action,github.actoris a special variable GitHub provides for the runner to use as a “username”. Similar to__token__usernames. - In
docker/login-action,secrets.GITHUB_TOKENis a secret GitHub provides for the runner to log back into other GitHub services. Reference: https://docs.github.com/en/actions/security-guides/automatic-token-authentication - In
docker/build-push-action, thepush: trueis what tells this action we want to push the image to the container image registry - In
docker/build-push-action, we are building for multiple hardware platforms viaplatforms: linux/amd64,linux/arm64. - In
docker/build-push-action, thetagsis essentially the tag name others will use to “pull” the image from. - We are using some other
github.*variables in thetagsto construct the image name in the container registry:github.repository: Repository name (i.e.marshallmcdonnell/intersect-training-cicd)github.ref_name: Short name of branch or tag, using it as a sort of “version number” (i.e.add-docs-cdorv0.1.0)
Let’s push this to the repository and see what happens!
git add .github/workflows/docs-cd.yml
git commit -m "Adds CD for docs to container image registry"
git push -u origin add-docs-cicd
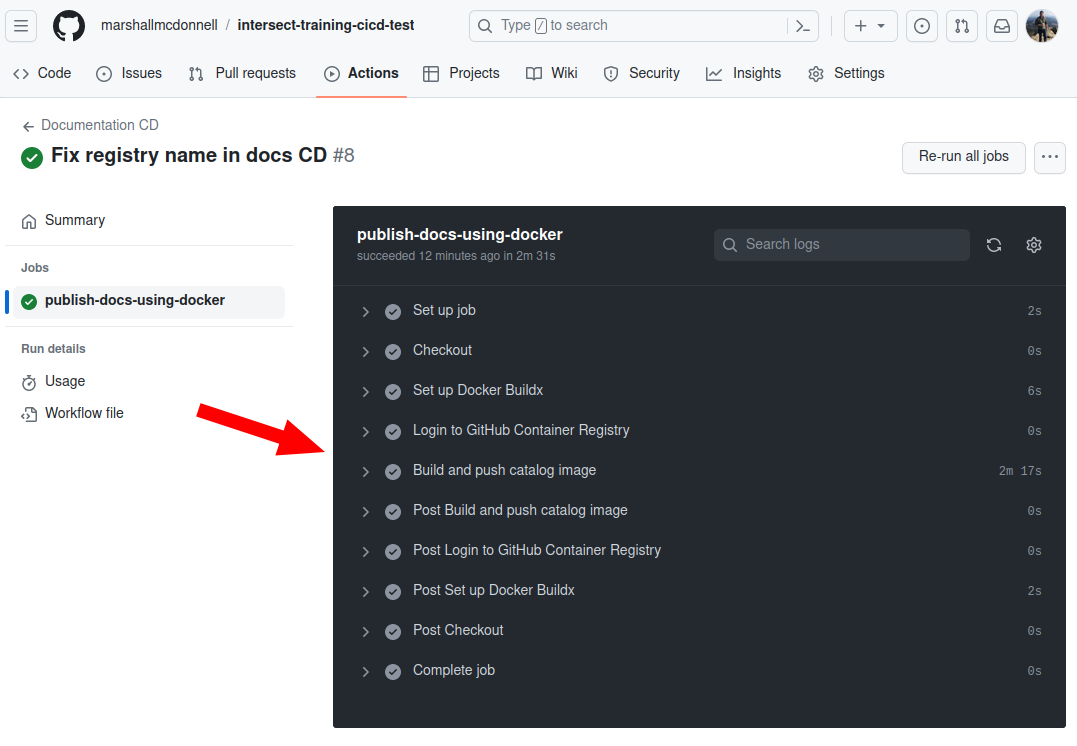
Looks like it passed!
And if we look at the “Packages” tab in GitHub, we should see our package!
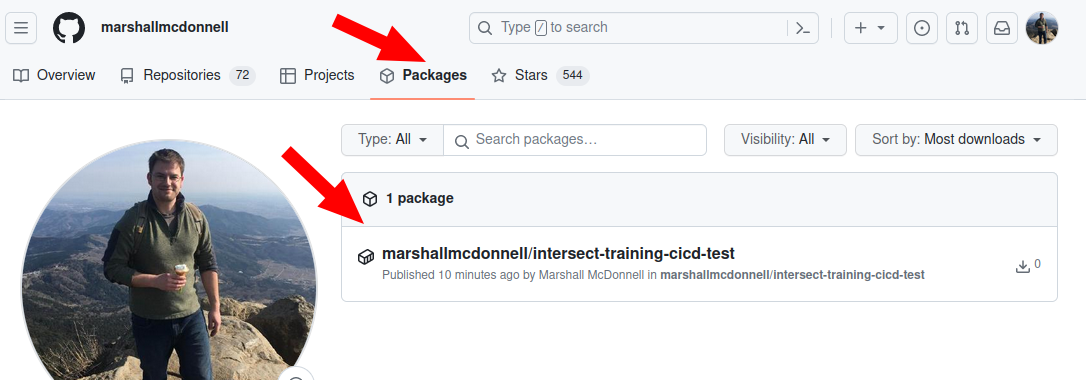
Going into the package, we can see our Users are given instructions on how to get this container via docker pull
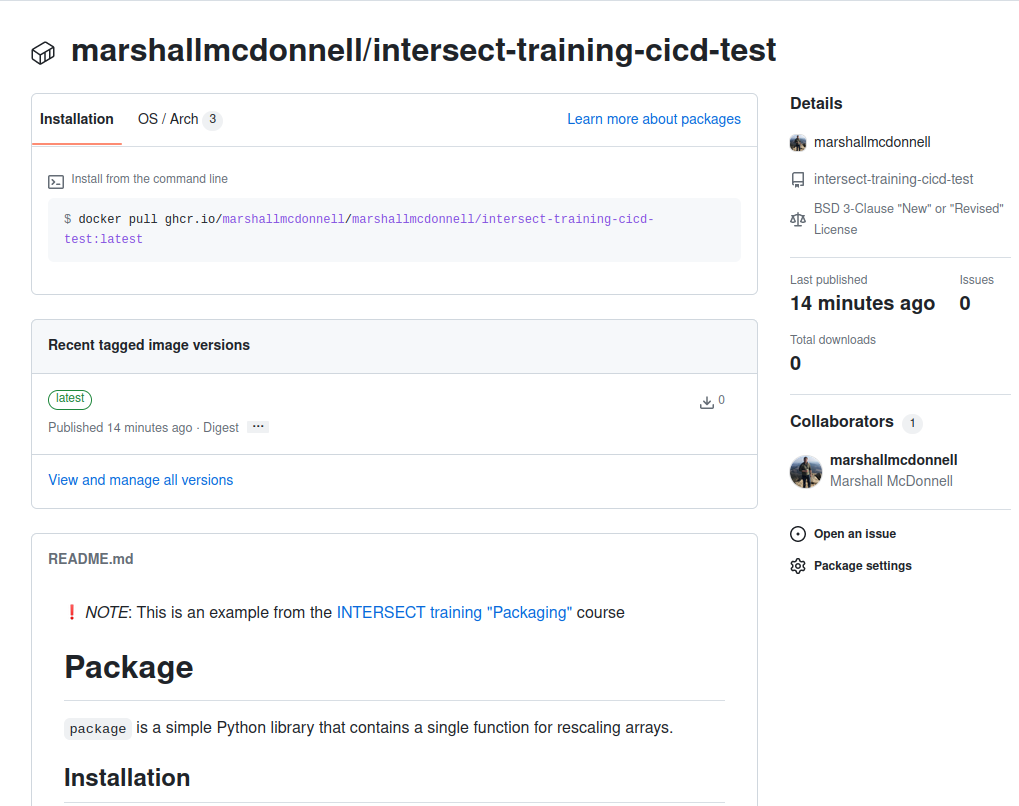
We can launch this container, mapping from the container port 80 (HTTP) to one on our host machine (8080), to spin up our docs server!
docker run -p 8080:80 <container image tag>
Then, navigate to http://localhost:8080.
Now we can allow operations or system administrators to serve our docs using containers!
Side note about our “CD”
Action: Question about our CD
So we just setup CD for a documentation server right?
Solution
Not quite. We are doing CD for the “publshing” part.
Yet, CD is continuous delivery or deployment. We really have not deployed our server. Someone else still has to do this for us right now.
True CD for a pipeline like this would include deploying this onto the server as a website
Wrap up
This wraps up CI/CD for containers.
Once you are happy, let’s use our open pull request for this branch and get it merged back into main!
Clean up local repository
To get your local repository up-to-date, you can run the following:
git checkout main
git pull
git remote prune origin # prune any branches deleted in the remote / GitHub that are still local
git branch -D add-docs-cicd # optional
Key Points
GitHub provides resources to publish container images
