All in One View
Content from Introduction
Last updated on 2025-08-11 | Edit this page
Estimated time: 5 minutes
Overview
Questions
- What is the purpose of this workshop?
Objectives
- n/a
Purpose
In a world where software is essential for nearly every aspect of modern life, the need for secure development have never been greater. However, many software engineers enter the workforce with limited knowledge or training on how to contribute to security during development without being security experts. In this workshop, you will learn about and participate in activities that software engineers can perform to make development more secure. These activities include:
- Identifying security risks
- Evaluating the trade-offs of addressing those risks
- Effectively communicating with other stakeholders about the problem.
This workshop is intended for research software engineers. Due to the diverse backgrounds an RSE can come from, we cannot speculate on your current security knowledge or expertise. Therefore, we assume you have limited knowledge of security. The good news is that this workshop is derived largely from the Developer Security Essentials workshop by Charles Weir. Developer Security Essentials aims to instruct software engineers on threat assessment and benefit analysis, requiring little security expertise. Other information in this workshop is informed by Charles Weir’s Secure Development Handbook. This handbook is a good reference guide for the topics of this workshop and contains additional topics you may find interesting.
“As someone working with developers and concerned about software security, you want the ‘how to do it’. Not the technical detail, but how you can change your professional approach and that of your colleagues to deliver adequate software security at a minimum cost. You reach for the dummies guide, and there’s nothing like that available. This book addresses that gap.”
Source: Secure Development Handbook
To start the workshop, we will play a card game called the “Agile Security Game.” This game does not require security expertise to play and motivates developers to start considering their own projects’ security and privacy requirements. We assume participants do not have a common project they can discuss, therefore an artifical project and its connections are supplied.
The next part of the workshop focuses on threat assessment and benefit analysis. In this activity, we explore the question “Who might do what bad thing to whom?” Similarly to the card game, an artifical project is supplied. This activity results in a list of identified threats to address. The next activity focuses on benefit analysis. In this activity, participants must make a case to “product management” about why they should address a given threat.
- Threat assessment and benefit analysis are both activities that developers can perform with little security expertise.
Content from Agile Security Game
Last updated on 2025-08-11 | Edit this page
Estimated time: 40 minutes
Overview
Questions
- How do you play the agile security game?
- What are the outcomes of the game?
Objectives
- For each Agile sprint, discuss and agree amongst yourselves which stories to implemnt.
- Record your chosen sotries for that sprint (write down the code letters).
Preparation in Advance - Face-to-Face
- Calculate how many players you’ll have, and so how many teams of 3-6 players you’ll need.
- Print the two side GamePlayerInstructionsPrinted.pdf sheet, one per player, preferably 2-sided.
- Print from CardsFourToPage.pdf a set of task cards for each team, on A4 paper, one sided and ideally on light card (black and white is fine, colour better). Then cut them out, preferably with a guillotine (or see below).
- Sort out cards in advance into individual mini-packs of a set of each (A, B, C, or D), according to the letters in the top right corner. Each pack has an additional ‘cover’ card. A packs have 8 cards; B, C, and D have 4 cards.
- Optionally, you might like to get large flipchart sheets of paper for the teams to use as Kanban boards on the table, or arrange for a whiteboard for each team with blu- tack to stick the cards there.
Setup on the Day
- Arrange the room with separate tables with 2-6 chairs around each table. Make there’s a piece of blank paper and pen for each team.
- Set up a projector/display visible to all the players, showing the DeveloperSecurityEssentials.pptx presentation. Note that if no projector/display screen is available, you could use the option of reading out the content of the slides instead.
- Sort out cards in advance into individual mini-packs of a set of each (A, B, C, or D), with cover. A packs have 8 cards; B, C, and D have 4 cards.
Running the Workshop
The workshop has an introduction, up to four rounds, or ‘sprints’, and a wrap-up session. Timings are approximate. Adjust them according to how the teams are getting on in each step.
TABLE 1: WHEN TO GIVE OUT CARDS
Tell the participants that they are taking the role of agile product managers for the MoneyZoom product; their role is to decide on the stories for the development team to tackle each sprint. In the first couple of sprints each team will be able to complete 11 story points, using the Kanban board on their shared board. Stories chosen from previous sprints will remain part of the product and available to mitigate attacks. Stories not chosen in a given sprint will remain on the backlog as candidates to be chosen in later sprints. Optionally you might use the first PowerPoint slide.
Face-to-face: Organise the players into teams of 2-6 people, each team sitting at chairs around a table, as shown in Figure 1. Give each player a set of Player Instructions.
The workshop then proceeds in ‘sprints’.
Player Instructions
We’ve got a problem. The app we released last week as apart of our researhc project has gone viral. People are downloading it by the tens of thousands; they’re all using it massively, and it’s received thousands of tweets and masses of mentions on every other social network. Even the Sunday newspaper has had an article on it.
Trouble is, we’re a small team and it was only supposed to be a limited pilot. We’ve put in only rudimentary security because we believed it under the radar for any of the likely attackers. But now we’ve got everyone from celebrities to my grandmother using it. AND IT’S NOT SAFE!
As the figure to the right shows, the functionality is all there and works well enough – fantastically done, team! Your mission now, should you choose to accept it, is to prioritise and implement the security enhancements to the system in the best way to minimise the threat to us and our users. Are you up for it?
It’s an agile project, of course, with two-week sprints. So each round in this game is a two week sprint. And for each sprint you have story cards with options you can take, and the estimated cost for each in estimation units. Some are security enhancements; some are test actions (the estimates include basic fixes that result from the testing); some are research activities which may lead to further tasks.
You have an initial budget for each sprint of 11 units, building up as you build up the team to 12 units for sprints 3 onwards; you can’t go over your budget and of course unused units don’t carry over the next sprint. You decide what you’ll do and the two weeks go by in a trice. And at the end of the sprint you’ll do a release of both app and server, and maybe get some new options opened up by the research you’ve done or the actions you’ve taken in the past.
And in the next sprint, and following sprint you do the same again. But remember – we also have a released product out there and maybe attackers will be DOING NASTY THINGS. Whether they’ll be successful or not depends on what decisions you made.
The game has some simplifications in timing. It ignores the time lag for getting apps from release to deployment. It assumes a stunningly agile team who can all move easily from server to app and from coding to reviewing to pen testing. And, remarkably, each task turns out to take exactly the effort estimated! So, you’ll get feedback on what NASTY THINGS have happened at the end of the sprint when you make each release.
For each sprint, discuss and agree amongst yourselves which stories to implement; record your chosen stories for that sprint (write down the code letters). The purpose and the learning of the game is in the discussion. Once the decisions are made, the game leader will feed back what has happened: any exploits seen during that sprint (of the code in the previous sprint’s release), and any new stories suggested by the learning from that sprint.
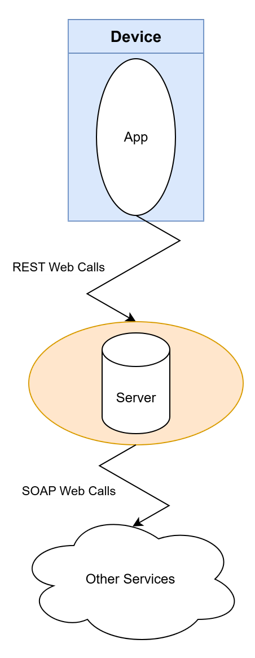
A Little Bit about Our App - MoodRing
We created “MoodRing” to enable participant mood-tracking in mental health studies. Here’s what I as a user can do with MoodRing:
- Report moods that I have experienced
- See my mood history
- Change my name, address and contact details
- Discuss with other app users
- Use the in-app analysis to find patterns in my moods
The MoodRing app communicates with an ‘App Server’, which itself is connected to a myriad of services related to storage, processing, and analysis as shown in Figure 2.
Sprints
Sprints 1-4 (10-25 minutes each)
- Copy/place new ‘cards’ as shown in Table 1 to each team’s table in the backlog area if possible (there may be more one set of cards to hand out). Note that you don’t take cards away at any point – cards that haven’t been used remain in the ‘backlog’ for future sprints.
- Online: Send the participants into their breakout rooms
- Have them then select their tasks to carry out by moving the selected cards to the ‘this sprint’ column on their table or otherwise choosing a set of cards.
- Allow the players time to discuss and decide. Typical timings are as in Table 2, but depend on the teams. Remember the point of the game is to learn from discussion, not to win; if there’s a good deal of discussion taking place and time permits, allow the teams longer.
- Online: Then bring them back to a plenary session or
- Face-to-face: Gain their attention.
- Show the attacks for the corresponding sprint using the presentation (or read them out from the Attacks and Mitigations document). The teams see which attacks succeeded on them.
Teams sometimes ‘negotiate’ on whether their chosen mitigations would actually have prevented the events. We suggest you enter into the spirit of it, and accept anything reasonable.
Sprint 1
Using 11 points, pick the stories that will be completed this sprint.
Scanning Kiddie – gets to server by accident – maliciously deletes all data.
DoSing Kiddie – gets to server by accident – uses for ddos attacks on other servers
Scanning Kiddie – gets to server by accident – maliciously deletes all data.
- Backup Server (BS): Having a backup server containing a recent backup of our data makes recovering from this event easier.
- Server patches up to date (PT): Server updates often times inlcude security patches that address identified vulnerabilities and implement countermeasures.
DoSing Kiddie – gets to server by accident – uses for ddos attacks on other servers
- Server patches up to date (PT): Server updates often times inlcude security patches that address identified vulnerabilities and implement countermeasures.
Sprint 2
Using 11 points, pick the stories that will be completed this sprint.
Hacking Kiddie – gets to server by accident – downloads and publishes what he finds.
Phishing Kiddie – sends spam email, gets subscribers to download rogue version or enter credentials in spoof website.
Detective or journalist hacker – wants account information for specific users – server hack – publishes information or causes customer complaints.
Hacking Kiddie – gets to server by accident – downloads and publishes what he finds.
- Server patches up to date (PT): Server updates often times inlcude security patches that address identified vulnerabilities and implement countermeasures.
Phishing Kiddie – sends spam email, gets subscribers to download rogue version or enter credentials in spoof website.
- Contingency Plan (CP): Establishing a publicity plan with keeps the threat in the forefront of the teams mind and allows for faster notifications and warnings to users about phishing threats.
- Two Factor Authentication (2F*): Establishing two-factor identification helps defend users from phishing attacks and our app from compromised accounts.
Detective or journalist hacker – wants account information for specific users, hacks the server, and publishes information or causes customer complaints.
- Server Pen testing (PT) AND Encrypt and Hide data on server (EH*): External penetration testing (that includes server patching as well) can identify vulnerabilities in our app and patch them accordingly. Encrypting and hiding the data on our server prevents exposure of sensitive data in the event of a security breach or data leak.
* requires penetration testing
Sprint 3
Using 12 points, pick the stories that will be completed this sprint.
MITM kiddie – Spoofs WiFi access point in airport – Gains credentials – randomly hacks accounts.
Aggrieved hacker – gains access to server – downloads or modifies server data – publicizes.
(FATAL) MITM Mafia – spoofs WiFi access point in airport – uses dodgy root certificates to validate all banking services - gains credentials – steals small amount from each.
MITM kiddie – Spoofs WiFi access point in airport – Gains credentials – randomly hacks accounts.
- HTTPS in Protocol (HP): HyperText Transfer Protocol Secure utilizes encryption for secure communications over the network, thus protecting traffic between the device and the server.
- Two Factor Authentication (2F): Establishing two-factor identification helps defend users from phishing attacks and our app from compromised accounts.
Aggrieved hacker – gains access to server – downloads or modifies server data – publicizes.
- Server Pen Testing, AND Encrypt and Hide data on Server (PT, EH*): External penetration testing (that includes server patching as well) can identify vulnerabilities in our app and patch them accordingly. Encrypting and hiding the data on our server prevents exposure of sensitive data in the event of a security breach or data leak.
MITM Mafia – spoofs WiFi access point in airport – uses dodgy root certificates to validate all external services - gains credentials – steals personal information from each.
- Forced Upgrades and SSL Pinning (FU, SS): Mandating up-to-date app versions and binding authentication certificates to specific services would protect against MITM attacks like this one.
- Two Factor Authentication (2F): Establishing two-factor identification protects user credentials.
* requires penetration testing Text Fatal
Sprint 4
Using 12 points, pick the stories that will be completed this sprint.
Mafia Team – Gain access to office, get passwords from server logs, stealing data from tens of thousands of accounts.
Mafia Advanced Programming Team – gain access to server though zero day exploit, installed hacked version, modifies mood data.
Mafia APT - Malware on device via email – sends back credentials found in logs to command and control server – used to steal and modify data.
Mafia Team – Gain access to office, get passwords from server logs, small theft from tens of thousands of accounts.
- Prevent Access to Office (PA): Physical security of servers is just as critical as virtual!
- Filtered Logging for Server (FL): Ensuring that logs do not contain sensitive or protected data helps prevent data leakage.
- Two Factor Authentication (2F): Establishing two-factor identification protects user credentials and defends against unauthorized logins.
Mafia Advanced Programming Team – gain access to server though zero day exploit, installed hacked version, modifies mood data.
- Network Monitoring for Server (NM): Monitoring network traffic is an excellent way find and stop on-going attacks. In this case, an unexpected server patch could indicate malicious activity.
Mafia APT - Malware on device via email – sends back credentials found in logs to command and control server – used to steal and modify data.
- Forced Upgrades AND Sanitize App Logging (FU, SA): Keeping strict requirements on app-versions can detect or defend against disguised malicious malware. In this example, sanitizing logs wold prevent secret data from being discovered and leaked.
- Two Factor Authentication (2F): Establishing two-factor identification protects user credentials and defends against unauthorized logins.
* requires penetration testing
Text Fatal
Wrap-Up (10 min)
Ask the teams to discuss what they feel they learned from the game. Then either get a representative to report back for each, or (larger group) use an ‘open ended’ question on Menti.com to gather and share feedback (this can work even face-to-face). You may like to explain some less obvious learning points (with the appropriate slide): - The password tasks (EP – Complex Passwords, and CC – Credential Changes) conflict with recent UK National Cyber Security Centre guidance, and have no benefit. - Detecting Jailbroken devices (DJ) doesn’t really help with app security – few apps do it nowadays. Similarly Review of Server Code (RS) is rarely used.
Some Notes about the Game
In a real world situation obviously one wouldn’t get feedback and lists of attacks before the start of the next agile sprint. If this worries you or the players, say that the ‘security enhancement’ sprints we’re doing here would actually be interspersed with a number of functionality sprints, allowing plenty of time for feedback before the next sprint. Observe in the attack descriptions that in some cases the mitigations are alternatives: the first attack could be mitigated by either BS or PT. But in other cases the teams must have completed all of a collection of tasks to mitigate the attack.
Some Notes about the Game
In a real world situation obviously one wouldn’t get feedback and lists of attacks before the start of the next agile sprint. These king of ‘security enhancement’ sprints we’re doing here would actually be interspersed with a number of functionality sprints, allowing plenty of time for feedback before the next sprint.
Also, observe in the attack descriptions that in some cases the mitigations are alternatives: the first attack could be mitigated by either BS or PT. But in other cases the teams must have completed all of a collection of tasks to mitigate the attack.
- Choosing how to use your limited resources to increase security is difficult.
- Assess possible threats before they happen!
Content from Threat Assessment
Last updated on 2025-08-11 | Edit this page
Estimated time: 5 minutes
Overview
Questions
- What process do I follow to identify threats?
Objectives
- Your group should identify some threats and discuss their risk and impact.
Setup in Advance
- Ensure there is a project for each participant to discuss. Each project should have at least 3 participants who know it well enough to discuss possible security problems.For participants with no such shared projects (or who have reasons not to discuss them), use the ‘MoodRing’ project from the previous Agile App Security Game workshop, and ensure each such participant has a printed description available (such as from the previous workshop).
Setup in Advance – Face-to-face
- Arrange tables for participants so each table has 3-6 participants, all familiar with one project.
- Place a large number of various coloured post-it notes and appropriate (sharpie- style) pens on each table.
- Set up whiteboards and flip charts (one for each project to be discussed the participants and one extra).
- Have a few (whiteboard/flipchart) marker pens in two contrasting (allowing for colour blindness) colours. E.g. Black and red, or blue and red.
- Locate a timing device (eg. mobile phone, physical timer, or Google Search “countdown timer”).
Introduction
You probably know that security is important. But how do you, as a developer, impact security? That first requires a different question: not how but what?
- What should you be worried about?
- What is likely to harm you, how would it happen?
- If it involves external attackers, what do they want, how might they go about getting it and how much do we care?
Finding the answers to these questions is called “Threat assessment” or “threat modelling.” In this activity, we will do a light-weight exercise to introduce you to the concept of threat-modelling.
The timings are approximate. Adjust them according to how the teams are getting on in each step.
Step 1: Ideation (30 min)
Display the slide with: Who might do what bad thing to whom? Person – Thing – Reason
Ask the groups to think about their project, and ‘ideate’ answers, writing down the person-thing-reason combinations on the post-its on their board. Encourage everyone to write independently (duplicates will be combined in the next step). Remind them that not every bad thing is malicious; sometimes security or privacy issues happen due to accident or misunderstandings. Encourage them to discuss the issues, and to gather as many completed post-its (‘threats’) as they reasonably can.
Step 2: Organisation (15 min)
Have the participants in each room cluster the ‘post-its’ into ‘topics’, posting related ones close together and duplicates on top of each other.
Step 3: Evaluation (15 min)
This step identifies the most important threats. Copy the ‘dot voting sets’ to the appropriate boards for each breakout room. Ask each participant to pick the threats (post-its) that are (a) most likely, and (b) most damaging. And to place a black dot next to the each of the three they consider most likely; and a red dot next to the three they think most damaging. When they’re done, take a photo of each of the resulting boards, for reference.
Step 4: Summary (10 min)
Get the Technical Leads or a responsible couple of people from each project to use the dots next to each post-it to position a selection of the threats on the grid. A dozen or so is a good number to aim for. Figure 4 shows an example (online); Figure 5, an example face-to-face. The threats towards the top right are the most important ones to consider in the corresponding projects.
Step 1: Discuss & Ideate
Who might do what bad thing to whom?
Person – Thing – Reason
Begin this section by thinking about the question above. Write down any combination of Person - Thing - Reason you can come up with on your worksheet. Feel free to write independently from the rest of your group.
Remeber that not every bad thing is malicious. Sometimes security or privacy issues happen due to accidents or misunderstandings. Discuss the issues amongst your group and gather as many completed threats as you can.
Step 2: Organize
Cluster the ‘post-its’ into ‘topics’ by posting related ones close together and duplicates on top of each other.
Step 3: Evaluation
This step identifies the most important threats.
- Pick the threats (post-its) that are (a) most likely, and (b) most damaging1.
- Place a black dot next to the each of the three you consider most likely;
- Place a red dot next to the three you think are most damaging.
Step 4: Summary
Using the risk-impact grid, place a selection of the threats onto their appropriate space.
This information will be used for the Benefit Analysis section!
The risk-impact grid is an inaccurate way to assess risks; however it is easy to understand and use. More sophisticated teams may well use better approaches, but these are outside the scope of this workshop.
- Not all “bad things” are malicious, sometimes accidents happen.
- Threats should be considered by their likeliness and impact.
Content from Benefit Analysis
Last updated on 2025-08-11 | Edit this page
Estimated time: 5 minutes
Overview
Questions
- How do you communicate about threats?
- How do you justify which threats to address?
Objectives
- By completing this activity, you should be more knowledgeable on how to communicate with managerment/decision makers about threats.
Introduction
By this point, your group should have a risk-impact grid populated with the threats that your group came up with.
Single group workshops: Now you are going to choose 2-3 threats that you want to discuss.
Multi-group workshops: Now you are going to choose one threat that you want to discuss.
Your new mission is to make a case to Product Management to address the threat, using the board to explain your conclusions. This requires two things:
- A way to address the threat (a ‘mitigation’, in security jargon), ideally with an idea of the effort required, or a means to discover what effort is required. This only needs to be sketchy.
- The positive benefit to the organisation of addressing the threat. This often requires some ingenuity.
Multi-group workshops: Select one person to present your findings to all of the groups.
Post-Workshop Survey
SMART:
- S: Specific
- M: Measurable
- A: Achievable
- R: Realistic
- T: Timely
Please take the remaining time to fill out the post workshop survey.
If you would like to add a post-workshop survey, I recommend adding a QR Code (if in person) or a link here (if online).
At the end of the survey, it will ask you to write a letter to your future self on what kind of changes you plan to make to your work processes in response to this workshop. When writing this letter, consider writing SMART objectives.
- Information on a threat’s likelihood, impact, and cost to address are required to make informed decisions on which threats should be addressed.